So, you’re ready to ditch that clunky TV stand and elevate your home entertainment with a sleek, space-saving Hanging Tv Mount? Fantastic! As your trusted expert from Dikfu.com, with over 15 years in the trenches of TV mount installation, I’m here to guide you through every step. Hanging your TV on the wall not only frees up floor space and adds a modern aesthetic, but it can also optimize your viewing experience. But before you grab your drill, let’s ensure you’re equipped with the knowledge to do it safely, securely, and smartly.
This comprehensive guide will demystify the process of selecting the perfect hanging TV mount, walk you through the installation, tackle common pitfalls, and share pro tips to make your TV a true centerpiece.
Understanding the Different Types of Hanging TV Mounts
Choosing the right hanging TV mount is the first, and arguably most crucial, step. Each type serves a different purpose, offering varying degrees of flexibility and aesthetic appeal.
1. Fixed TV Mounts: The Low-Profile Champion
What they are: Fixed mounts are the simplest and most common type, holding your TV flat and snug against the wall, much like a picture frame. They offer no tilt, swivel, or extension capabilities once installed.
Why choose them:
- Sleek Aesthetics: They provide the lowest profile, making your TV appear almost flush with the wall.
- Cost-Effective: Generally the most affordable option.
- Security: Very sturdy and secure, ideal for high-traffic areas or homes with children and pets.
- Easy Installation: Typically the easiest to install, requiring minimal adjustments.
|
Our Picks for the Best TV Mount in 2026
As an Amazon Associate I earn from qualifying purchases.
|
||
| Num | Product | Action |
|---|---|---|
| 1 | Amazon Basics Full Motion Articulating TV Wall Mount, with Swivel and Tilt, for 26\" to 55\" TVs and Flat Panels up to 80 Lbs, VESA Compatible, Black |

|
| 2 | Magnetic Monitor Wall Mount for Steel Surfaces, Fits 13 to 34 Inch Screens, Holds up to 22 lbs, VESA 75/100 Compatible Wall Mount for Computer and TV Monitor, No-Drill Installation with All Screws |
|
| 3 | USX Mount Full Motion TV Wall Mount for Most 42-90 inch Flat Screen/LED/4K, TV Mount Bracket Dual Swivel Articulating Tilt 6 Arms, Max 16\" Wood Studs, VESA 600x400mm, Holds up to 132lbs |
|
| 4 | MOUNTUP Full Motion TV Wall Mount for Most 26-60 Inch TVs, Max VESA 400x400mm Wall Mount TV Bracket with Swivel Tilting Extension Level Adjustment for LED LCD Flat Curved TVs Up to 77 LBS, MU0018 |
|
| 5 | Pipishell Full Motion TV Wall Mount for Echo Show 21/15 and 13-43 Inch Flat Curved Screen TVs & Monitors, Max VESA 200x200mm up to 44lbs, TV Mount Wall Bracket with Rotation Swivel Tilt Extension |
|
| 6 | Mounting Dream TV Wall Mount for 32-65 Inch Television,Mount with Swivel and Tilt, Full Motion Bracket with Articulating Dual Arms, Fits 16inch Studs, Max VESA 400X400 mm, 99lbs, MD2380 |
|
| 7 | Perlegear Full Motion TV Wall Mount for Most 42–86 inch Flat Curved TVs up to 132 lbs, 12″/16″ Wood Studs, Bracket with Articulating Arms, Swivel, Tool-Free Tilt, Max VESA 600x400mm PGLF12 |
|
| 8 | monTEK Motorized Ceiling TV Mount for 43-86 Inch TVs, Heavy-Duty 121lbs (4X Load Tested), Off-Center VESA Compatible, Electric Flip Down with Remote/App/Voice Control, Fits Flat & Pitched Roof |
|
| 9 | Mounting Dream TV Wall Mount for Most 37-75 Inch TVs, Universal Tilt TV Mount Fit 16\", 18\", 24\" Stud with Loading Capacity 132lbs, Max Vesa 600 x 400mm, Low Profile Flat Wall Mount TV Bracket |
|
| 10 | USX MOUNT Full Motion TV Wall Mount for Most 32-70 inch TVs up to 99 lbs, Wall Mount Bracket with Dual Articulating Arms, Swivel, Tilt, Max VESA 400x400mm, TV Mount Fits 12”/16” Wood Studs |
|
Considerations: Best for rooms where your primary viewing position is directly in front of the TV at eye level, and you don’t need to adjust the angle. Cable access can be tricky with extremely low-profile designs.
2. Tilting TV Mounts: Angle Your Way to Better Viewing
What they are: Tilting mounts allow you to adjust your TV vertically, typically by 5 to 15 degrees up or down. They don’t offer horizontal swivel or extension.
Why choose them:
- Glare Reduction: Perfect for reducing glare from windows or lights, especially if your TV is mounted higher than eye level (e.g., above a fireplace).
- Optimized Viewing: Improves the viewing experience if you’re watching from different vertical angles, such as lying in bed or sitting on a high sofa.
- Cable Access: The slight distance from the wall can make accessing cables a bit easier than with fixed mounts.
Considerations: While great for vertical adjustments, they don’t solve issues related to side-to-side viewing angles.
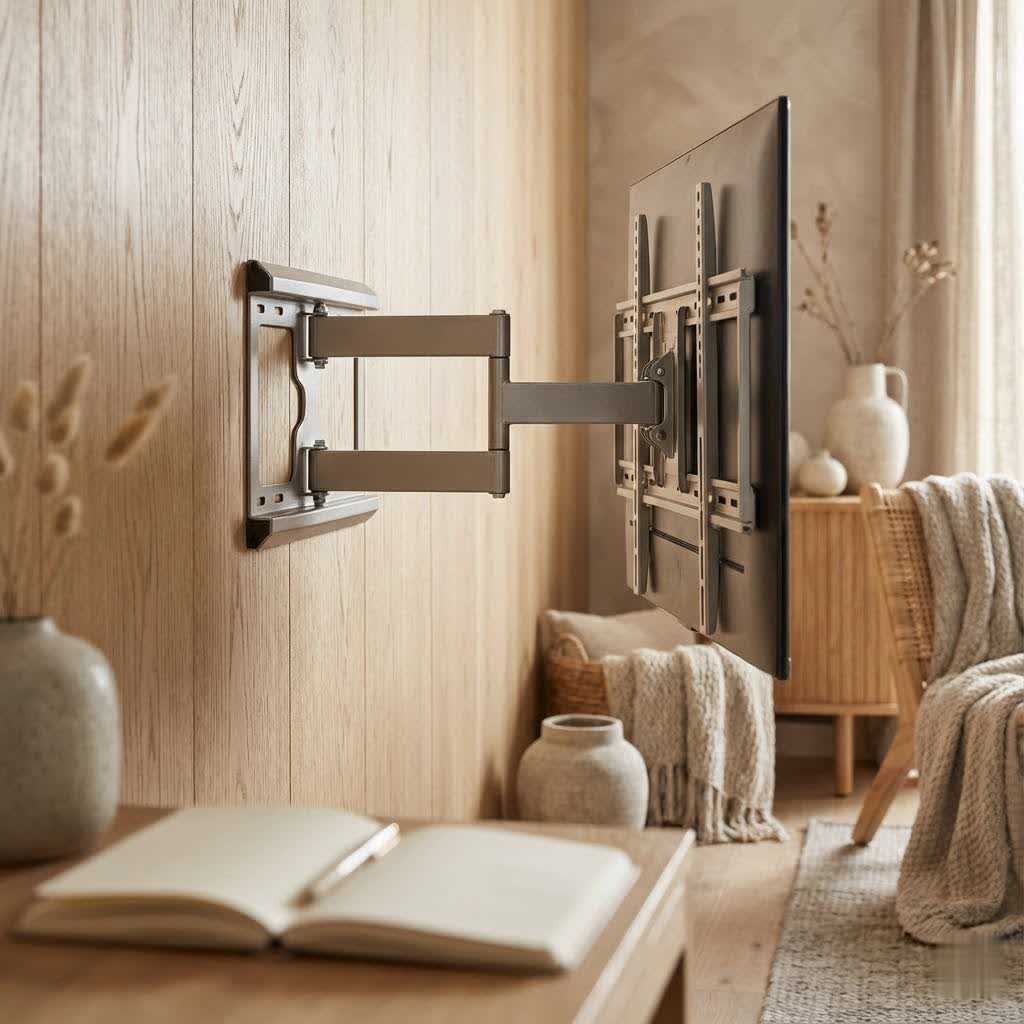
3. Full-Motion (Articulating/Swivel) TV Mounts: The Ultimate in Flexibility
What they are: These are the most versatile hanging TV mount options. They come with an articulating arm that allows you to extend the TV away from the wall, tilt it vertically, and swivel it horizontally, sometimes up to 180 degrees. Manufacturers often use terms like “extending arm,” “articulating,” or “swivel” to describe them.
Why choose them:
- Maximum Viewing Angles: Ideal for open-concept rooms, corner installations, or spaces where you watch TV from multiple seating areas.
- Easy Cable Access: The ability to pull the TV away from the wall makes connecting and disconnecting cables a breeze.
- Reduced Glare: Offers superior glare reduction by allowing both vertical tilt and horizontal swivel.
Considerations:
- Higher Cost: Generally more expensive due to their complex design.
- More Complex Installation: Can be a bit more challenging to install and may require two people, especially for larger TVs.
- Wall Reinforcement: Larger, heavier full-motion mounts often require solid wall studs to ensure secure installation.
“Choosing the right mount isn’t just about aesthetics; it’s about matching the mount’s functionality to your living space and viewing habits. A full-motion mount might seem like overkill for a dedicated home theater, but it’s a game-changer for a multi-purpose living room,” advises David Kim, Lead Content Creator at Dikfu.com.
How to Choose the Right Hanging TV Mount for Your Space
Before you even think about drilling, you need to ensure your chosen hanging TV mount is compatible with your TV and suitable for your wall and viewing needs.
1. Check Your TV’s Size and Weight Capacity
Every TV mount has a maximum screen size and weight capacity it can safely support. Exceeding these limits is a recipe for disaster.
- TV Size: While mounts often list a range (e.g., 32″-70″), it’s more about VESA compatibility and weight.
- TV Weight: Crucially, check your TV’s manual for its exact weight (without the stand). Your mount MUST be rated for at least this weight, and ideally, have a buffer.
2. Understand VESA Compatibility
VESA (Video Electronics Standards Association) sets the standard for the mounting hole patterns on the back of most TVs.
- Locate VESA Holes: On the back of your TV, you’ll find four screw holes in a square or rectangular pattern.
- Measure the Pattern: Measure the horizontal and vertical distance between these holes in millimeters (e.g., 200x200mm, 400x400mm). This is your TV’s VESA pattern.
- Match the Mount: Your hanging TV mount must support your TV’s VESA pattern. Most universal mounts accommodate a range of VESA sizes.
3. Identify Your Wall Type
Knowing your wall type is paramount for a secure installation.
- Wood Stud Walls (Drywall over wood studs): This is the most common and safest for mounting. You’ll need a stud finder to locate the wooden studs, which are typically 16 or 24 inches apart. Always drill lag bolts into the center of a stud.
- Concrete/Brick Walls: Require special concrete anchors and a masonry drill bit. These are very strong and secure.
- Metal Stud Walls: Less common in residential homes. Metal studs require specific toggle bolts or metal stud anchors. Consult a professional if unsure.
- Drywall Only (No Studs): NEVER mount a TV directly into drywall without hitting a stud or using appropriate heavy-duty drywall anchors specifically designed for heavy loads (e.g., toggle bolts). For larger, heavier TVs, even these anchors might not be sufficient. When in doubt, always aim for studs.
4. Consider Your Viewing Angle and Room Layout
- Fixed Mount: Best when you have a dedicated seating area directly in front of the TV.
- Tilting Mount: Ideal if the TV is mounted high, like above a fireplace, or if glare is a consistent issue.
- Full-Motion Mount: Perfect for flexible viewing, multiple seating areas, or if you need to access cables frequently. Think about how often you might adjust the screen.
5. Assess Cable Management Needs
Consider where your power outlets and cable ports are. If your TV ports face directly backward, a very low-profile fixed mount might make connections difficult. Full-motion mounts offer the most space for routing cables.
Step-by-Step Guide to Safely Installing Your Hanging TV Mount
Alright, you’ve picked the perfect mount. Now for the satisfying part: getting it on the wall! While specific steps may vary slightly by mount, this general guide covers the essentials for a secure and professional-looking installation. Always refer to your mount’s specific instruction manual first.
Essential Tools You’ll Need:
- Stud Finder: A digital stud finder is non-negotiable for wood stud walls.
- Level: A 24-inch or longer level ensures your TV isn’t crooked.
- Power Drill: With appropriate drill bits for pilot holes and lag bolts.
- Socket Wrench: To properly tighten lag bolts into studs. Don’t rely solely on a drill for this.
- Tape Measure: For accurate placement.
- Pencil: For marking.
- Phillips Head Screwdriver: For attaching brackets to the TV.
- Safety Glasses: Protect your eyes!
- A Helper: Especially for larger, heavier TVs – don’t try to lift a big screen alone!
Installation Steps:
-
Preparation is Key:
- Unbox Everything: Lay out all mount components and hardware. Ensure nothing is missing.
- Remove TV Stand/Feet: If your TV has a stand, remove it now.
- Attach TV Brackets: Secure the vertical mounting brackets to the back of your TV using the screws and spacers provided in your mount kit. Ensure they are snug but do not over-tighten, as this can damage the TV. Make sure the brackets don’t obstruct any ports you plan to use.
-
Determine TV Placement & Height:
- Ideal Eye Level: Generally, the center of the TV screen should be at eye level when you’re seated. Have your helper hold the TV (or just the wall plate if it’s too heavy) against the wall at your desired height while you sit and assess.
- Mark the Top Edge: Once you’ve found the ideal height, lightly mark the top edge of where the TV (or wall plate) will sit with a pencil.
-
Locate Wall Studs (for wood stud walls):
- Scan the Area: Use your stud finder to locate the vertical wooden studs behind your drywall. Scan horizontally across the marked area.
- Mark the Edges & Center: Stud finders usually indicate both edges of a stud. Mark both edges, then find the center point. You’ll need to hit at least two studs for most mounts, though larger mounts may require more.
- Verify with a Small Nail: If unsure, drive a small finishing nail into your marks; if you hit wood, you’ve found a stud. Patch the tiny hole later if needed.
-
Position the Wall Plate:
- Use the Template: Many mounts come with a paper template. Tape it to the wall, aligning it with your height marks and centered over your marked studs. Use your level to ensure it’s perfectly straight.
- Mark Drill Holes: Mark the exact spots for drilling through the template. Double-check that these marks align with the center of your studs.
-
Drill Pilot Holes:
- Choose the Right Bit: Your mount instructions will specify the correct drill bit size for pilot holes. This is crucial—too small, and you risk splitting the stud; too large, and the lag bolts won’t grip securely.
- Drill Straight: Drill the pilot holes directly into the center of your marked studs, keeping the drill perfectly straight and perpendicular to the wall. Drill deep enough to accommodate the full threaded length of your lag bolts.
-
Attach the Wall Plate to the Wall:
- Position the Plate: Align the wall plate with your drilled pilot holes.
- Insert & Tighten Lag Bolts: Hand-start the lag bolts into the pilot holes, then use your socket wrench to tighten them. Tighten securely, but don’t over-crank, which can strip the stud.
-
Hang the TV:
- Teamwork Time: With your helper, carefully lift the TV. Align the TV brackets with the corresponding slots or hooks on the wall plate.
- Engage Locking Mechanism: Gently lower the TV until it hooks securely onto the wall plate. Most mounts have a locking mechanism (screws, straps, or clips) at the bottom to prevent the TV from accidentally being knocked off. Engage these!
- Final Level Check: Use your level one last time to ensure the TV is perfectly straight. Most mounts allow for minor post-installation leveling adjustments.
Cable Management and Aesthetic Touches
Now that your TV is beautifully hanging on the wall, don’t let a tangle of cables ruin the look!
- In-Wall Cable Management Kits: For the cleanest look, consider an in-wall cable management kit. These allow you to safely run power and AV cables behind the drywall, emerging near your entertainment console. Always ensure local electrical codes are followed, especially for power cables.
- Cable Covers/Raceways: If in-wall routing isn’t an option, surface-mounted cable raceways can be painted to match your wall, providing a neat solution.
- Velcro Ties/Cable Sleeves: Use these to bundle and organize cables behind the TV and down to your components, minimizing visual clutter.
Common Hanging TV Mount Installation Mistakes and How to Avoid Them
Even seasoned DIYers can make mistakes. Here are some of the most common ones and how to sidestep them:
- Not Locating Studs Properly: Relying on a weak stud finder or guessing can lead to an insecure mount. Invest in a good quality stud finder and verify your findings.
- Using the Wrong Hardware: Always use the lag bolts and anchors recommended by the mount manufacturer for your wall type. Never substitute with weaker screws.
- Incorrect Pilot Hole Size: Too small, and you risk splitting wood; too large, and the bolts won’t hold. Double-check the instructions for the exact drill bit size.
- Mounting Too High or Too Low: The “eye-level” rule is a good guideline. Mounting a TV too high can lead to neck strain.
- Not Leveling: A crooked TV is a constant eyesore. Use a good level throughout the process.
- Over-Tightening Bolts: While you want a secure fit, over-tightening lag bolts can strip the wood stud, compromising the mount’s integrity.
- Ignoring Cable Management: Leaving cables dangling detracts from the clean aesthetic you worked hard to achieve. Plan for cable routing before you start.
- Attempting Alone: For safety, always have a second person help with lifting and positioning the TV, especially larger models.
Frequently Asked Questions (FAQ) about Hanging TV Mounts
Q1: How high should I hang my TV?
A1: The general rule of thumb is to position the center of the TV at eye level when you are comfortably seated. For most living rooms, this is typically around 42-48 inches from the floor, though it depends on your seating height and personal preference.
Q2: Can I hang a TV mount on drywall without studs?
A2: It’s strongly discouraged for most TVs. Drywall alone is not strong enough to support the weight of a TV. You must mount into wood studs, concrete, brick, or use heavy-duty, specialty drywall anchors rated for the TV’s weight. For larger, heavier TVs, always hit a stud.
Q3: How do I find the VESA pattern on my TV?
A3: The VESA pattern refers to the four screw holes on the back of your TV. You can find these measurements (horizontal x vertical in millimeters) in your TV’s manual or by measuring them yourself with a tape measure.
Q4: What tools do I absolutely need for a DIY TV mount installation?
A4: At a minimum, you’ll need a stud finder, a level, a power drill with appropriate bits, a socket wrench, a tape measure, a pencil, and a Phillips head screwdriver. Safety glasses and a helper are also highly recommended.
Q5: How do I hide the cables after mounting my TV?
A5: You can use in-wall cable management kits for a seamless look, surface-mounted cable raceways that can be painted, or simply bundle and secure cables behind the TV with Velcro ties or cable sleeves to minimize their visibility.
Q6: How much weight can a hanging TV mount hold?
A6: Every hanging TV mount has a specified weight capacity, usually printed on the packaging or in the manual. It’s crucial that your TV’s weight (without its stand) is well within this limit for safe installation.
Q7: Can I install a full-motion TV mount by myself?
A7: While some experienced DIYers might manage smaller full-motion mounts alone, it’s highly recommended to have a second person assist, especially when attaching the TV to the extended arm and making final adjustments. The weight and awkwardness of the TV make it a two-person job for safety.
Conclusion: Elevate Your Viewing Experience with a Secure Hanging TV Mount
Installing a hanging TV mount can dramatically transform your living space, offering a cleaner aesthetic, improved viewing angles, and a truly immersive entertainment experience. While it might seem daunting at first, by understanding the different types of mounts, carefully selecting the right one for your TV and wall, and meticulously following the installation steps, you can achieve a professional-quality setup.
Here at Dikfu, we believe everyone can master the art of home improvement with the right guidance. Take your time, double-check your measurements, and always prioritize safety. Your perfectly mounted TV awaits, ready to be the envy of your friends and the centerpiece of your home. So go ahead, confidently tackle that DIY project, and enjoy the fruits of your labor!