Mounting your flat screen TV on the wall is a practical way to enhance your home entertainment setup, offering a modern aesthetic and reclaiming living space. A properly installed flat screen TV wall mount ensures optimal viewing and can be a straightforward DIY task with the right knowledge and tools. This guide, informed by over 15 years of TV mount installation experience, will cover everything from selecting the perfect mount to a safe, step-by-step installation process.
Understanding Your Options: Types of Flat Screen TV Wall Mounts
Choosing the right flat screen TV wall mount is the first and most crucial step. It’s not a one-size-fits-all situation, as different mounts offer varying degrees of flexibility and aesthetic profiles. For best tv mounts roundups on this site.
Fixed TV Wall Mounts
Fixed mounts are the simplest and most economical choice. They hold your TV nearly flush against the wall, offering a clean, contemporary look that mimics a picture frame.
- Pros: Minimalist design, low profile (often less than an inch from the wall), most affordable, generally easiest to install. Ideal for spaces where your viewing position is always directly in front of the TV at eye level.
- Cons: Absolutely no adjustability. Once it’s up, it’s up. This can lead to glare issues from windows or lights if not positioned carefully, and accessing cables behind the TV can be a chore.
Tilting TV Wall Mounts
Tilting mounts offer a bit more flexibility than fixed mounts, allowing you to adjust the vertical angle of your TV screen, typically between 5 and 15 degrees.
- Pros: Excellent for reducing glare from overhead lights or windows, especially useful if your TV is mounted higher than eye level (like above a fireplace). Improves viewing comfort by angling the screen downwards.
- Cons: No side-to-side adjustment. The TV will sit slightly further from the wall (around 2 inches) to accommodate the tilt mechanism.
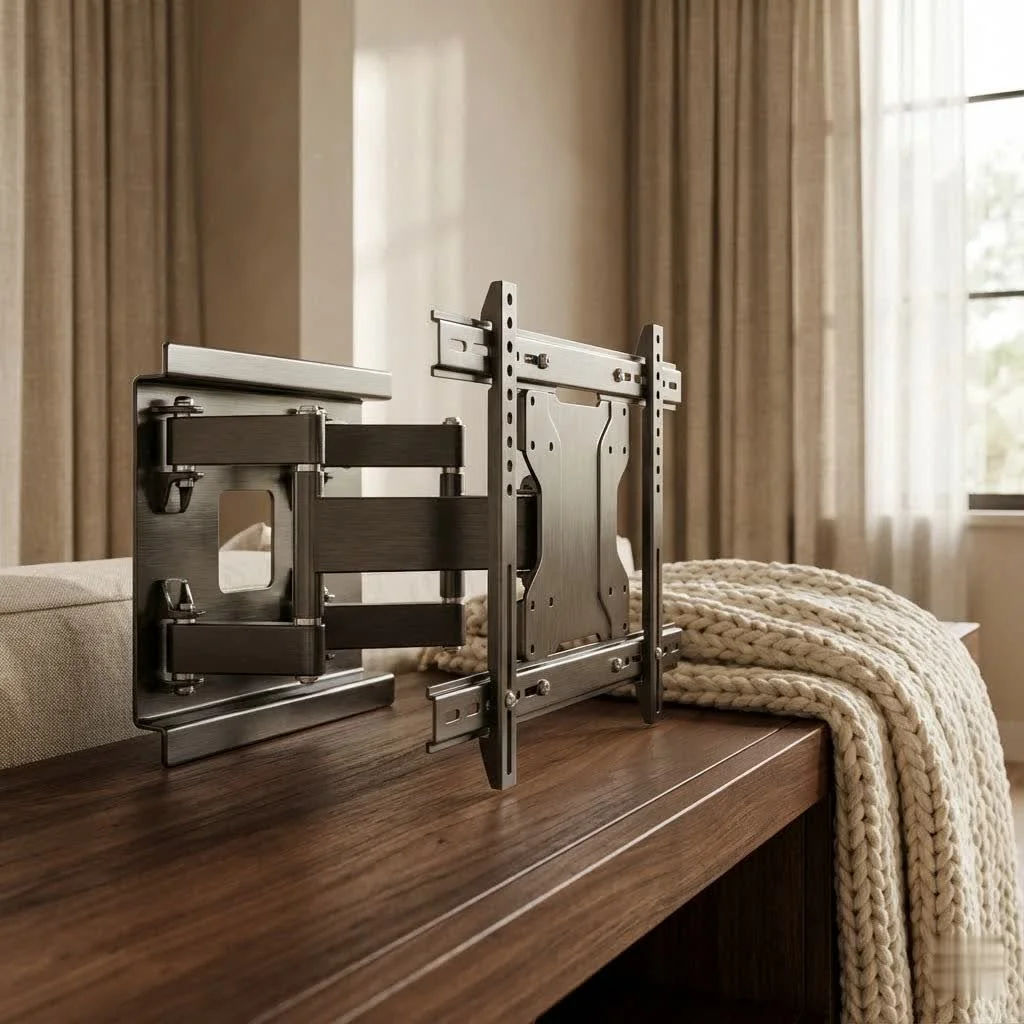
Full-Motion (Articulating) TV Wall Mounts
These are the champions of flexibility, allowing you to pull your TV out from the wall, swivel it left or right, and tilt it up or down. They’re often called articulating mounts due to their multi-jointed arms.
- Pros: Maximum versatility for viewing from multiple angles or different rooms. Perfect for corner installations or for adjusting the TV throughout the day to combat glare. Provides easy access to cables behind the TV for adjustments or connecting new devices.
- Cons: Generally the most expensive and complex to install. They don’t sit as close to the wall as fixed or tilting mounts, leaving a noticeable gap. Requires careful cable planning to ensure cables are long enough and managed properly during movement.
Specialized Mounts
|
Our Picks for the Best TV Mount in 2026
As an Amazon Associate I earn from qualifying purchases.
|
||
| Num | Product | Action |
|---|---|---|
| 1 | Magnetic Monitor Wall Mount for Steel Surfaces, Fits 13 to 34 Inch Screens, Holds up to 22 lbs, VESA 75/100 Compatible Wall Mount for Computer and TV Monitor, No-Drill Installation with All Screws |

|
| 2 | Mounting Dream TV Wall Mount for Most 37-75 Inch TVs, Universal Tilt TV Mount Fit 16\", 18\", 24\" Stud with Loading Capacity 132lbs, Max Vesa 600 x 400mm, Low Profile Flat Wall Mount TV Bracket |
|
| 3 | USX Mount Full Motion TV Wall Mount for Most 42-90 inch Flat Screen/LED/4K, TV Mount Bracket Dual Swivel Articulating Tilt 6 Arms, Max 16\" Wood Studs, VESA 600x400mm, Holds up to 132lbs |
|
| 4 | Pipishell Full Motion TV Wall Mount for Echo Show 21/15 and 13-43 Inch Flat Curved Screen TVs & Monitors, Max VESA 200x200mm up to 44lbs, TV Mount Wall Bracket with Rotation Swivel Tilt Extension |
|
| 5 | USX MOUNT Full Motion TV Wall Mount for Most 32-70 inch TVs up to 99 lbs, Wall Mount Bracket with Dual Articulating Arms, Swivel, Tilt, Max VESA 400x400mm, TV Mount Fits 12”/16” Wood Studs |
|
| 6 | Mounting Dream TV Wall Mount for 32-65 Inch Television,Mount with Swivel and Tilt, Full Motion Bracket with Articulating Dual Arms, Fits 16inch Studs, Max VESA 400X400 mm, 99lbs, MD2380 |
|
| 7 | monTEK Motorized Ceiling TV Mount for 43-86 Inch TVs, Heavy-Duty 121lbs (4X Load Tested), Off-Center VESA Compatible, Electric Flip Down with Remote/App/Voice Control, Fits Flat & Pitched Roof |
|
| 8 | MOUNTUP Full Motion TV Wall Mount for Most 26-60 Inch TVs, Max VESA 400x400mm Wall Mount TV Bracket with Swivel Tilting Extension Level Adjustment for LED LCD Flat Curved TVs Up to 77 LBS, MU0018 |
|
| 9 | Perlegear Full Motion TV Wall Mount for Most 42–86 inch Flat Curved TVs up to 132 lbs, 12″/16″ Wood Studs, Bracket with Articulating Arms, Swivel, Tool-Free Tilt, Max VESA 600x400mm PGLF12 |
|
| 10 | Amazon Basics Full Motion Articulating TV Wall Mount, with Swivel and Tilt, for 26\" to 55\" TVs and Flat Panels up to 80 Lbs, VESA Compatible, Black |
|
While fixed, tilting, and full-motion cover most needs, some specialized flat screen TV wall mount options exist:
- Pull-Down Mounts: Designed for high placements, especially above fireplaces, allowing you to pull the TV down to eye level when watching.
- Ceiling Mounts: An alternative when wall mounting isn’t feasible, suspending the TV from the ceiling.
As industry expert, Lena Petrova, from our Dikfu Labs often says, “Choosing the right mount is like picking the right foundation for a house – it dictates stability, flexibility, and overall aesthetic. Don’t rush this decision; consider your lifestyle and viewing habits first.”
Choosing the Perfect Flat Screen TV Wall Mount for Your Setup
Beyond the type of movement, several critical factors must align for a safe and satisfying installation.
TV Size and Weight Capacity
This is non-negotiable for safety. Every flat screen TV wall mount has a specified range of TV sizes and a maximum weight it can safely support.
- Always check your TV’s manual or manufacturer’s website for its exact weight and diagonal screen size.
- Never exceed the mount’s stated weight capacity. An undersized mount can sag, or worse, fail completely, leading to costly damage or injury. Look for UL listed or ETL certified mounts, as they have undergone rigorous testing for safety and reliability.
VESA Mounting Pattern: Your TV’s Fingerprint
The Video Electronics Standards Association (VESA) created a universal standard for the screw hole pattern on the back of most modern flat screen TVs. This VESA pattern is crucial for compatibility.
- How to find it: Check your TV manual, manufacturer’s website, or simply measure. Measure the horizontal distance (in millimeters) between the center of the left and right mounting holes, then the vertical distance (in millimeters) between the center of the top and bottom holes. So, 400x400mm means 400mm horizontally and 400mm vertically.
- Common sizes: 200x200mm for smaller TVs (up to 32 inches), 400x400mm for mid-sized (up to 60 inches), and 600x400mm for larger screens (70 inches or more). Ensure your chosen mount accommodates your TV’s VESA pattern.
Your Viewing Habits & Room Layout
Think about how you use your TV:
- Single viewing spot? A fixed or tilting mount might suffice.
- Multiple seating areas, or often watching from the kitchen? A full-motion flat screen TV wall mount is your best friend.
- Sunlight or glare a constant problem? Tilting or full-motion mounts offer crucial adjustability.
- Mounting in a corner? Full-motion mounts are specifically designed for this.
Wall Type Matters: The Foundation of Your Installation
Different walls require different mounting strategies and hardware.
- Wood Stud Walls: The most common and secure. You’ll screw directly into the wooden studs behind the drywall.
- Concrete/Brick (Masonry) Walls: These require special masonry anchors and a heavy-duty drill with appropriate drill bits. Drill into the brick or mortar joints.
- Drywall (without studs): This is tricky for heavy flat screen TVs. Standard drywall cannot support a significant amount of weight. While some “studless” mounts exist for lighter TVs, for larger, heavier screens, it’s always best to hit at least two studs. If studs aren’t where you need them, consider professional installation or a different mounting solution like a freestanding TV stand. Never gamble with your TV’s safety on drywall alone.
Cable Management & Aesthetics
Consider how you want your cables to look (or not look!).
- If a slim profile is paramount, ensure your TV’s ports face sideways or downwards, or be prepared for in-wall cable routing.
- Full-motion mounts often have channels for cable routing, but you’ll still need a plan for the section between the wall and the mount itself.
Step-by-Step: Installing Your Flat Screen TV Wall Mount Safely
Ready to roll up your sleeves? Here’s a general guide. Always defer to your specific mount’s instructions, but these steps provide a solid framework.
1. Gather Your Tools
Having the right tools makes all the difference:
- Flat screen TV wall mount kit (with all hardware)
- Stud finder (electronic is best)
- Level (long enough for the mount)
- Electric drill and various drill bits (wood bits for studs, masonry bits for brick/concrete)
- Socket wrench or screwdriver set
- Measuring tape
- Pencil
- Safety glasses
- A friend to help! (Highly recommended for lifting the TV)
2. Choosing the Optimal Location and Height
Before drilling, plan your TV’s position.
- Eye Level is Key: The general rule of thumb is to place the center of the screen at eye level when you’re seated. For a typical living room, this often means the bottom of a 42-inch TV is around 56 inches from the floor, and a 70-inch TV around 67 inches. Adjust based on your primary seating.
- Consider all factors: Avoid direct sunlight or heat sources (like fireplaces, unless using a pull-down mount designed for it). Ensure easy access to power outlets and input sources.
3. Locate Wall Studs
This is where your stud finder comes in.
- Scan the wall where you intend to mount the TV, marking the edges and center of at least two adjacent studs. Your mount should ideally span across two studs for maximum stability.
- For masonry walls, skip stud finding and prepare for masonry anchors.
4. Mark and Drill Pilot Holes
Precision is paramount.
- Hold the wall mount bracket against the wall, aligning it with your stud marks. Use your level to ensure it’s perfectly straight.
- Mark the exact drilling spots through the mount’s holes with your pencil.
- Using the appropriate drill bit (matching the size of your lag bolts) and your drill, carefully create pilot holes at your marks. For concrete/brick, ensure deep enough holes for anchors.
5. Secure the Wall Bracket
- Align the wall bracket with your pilot holes.
- Insert the lag bolts (and wall anchors for masonry) and tighten them securely with your socket wrench. Do not overtighten, as this can strip the wood or damage the wall. The mount should be rock-solid. Give it a good tug test!
6. Attach Mounting Arms to Your TV
- Carefully lay your flat screen TV face down on a soft, clean surface (like a blanket on a table).
- Locate the VESA mounting holes on the back of your TV.
- Attach the vertical mounting arms or plate from your kit to the TV, using the provided screws and spacers that match your TV’s VESA pattern. Ensure these are snug but again, don’t overtighten.
7. Mount the TV to the Wall
This is a two-person job for almost all flat screen TVs.
- With your helper, carefully lift the TV and hook the mounting arms/plate onto the wall bracket. Most mounts have a locking mechanism or safety screws. Engage these immediately.
- Once hung, gently test the TV’s stability. Try to push it slightly from side to side and up and down. It should feel secure.
- If you have a tilting or full-motion mount, adjust the tilt or swivel as needed to fine-tune your viewing angle.
Beyond the Basics: Cable Management and Aesthetics
A beautifully mounted flat screen TV loses its appeal with a tangle of wires dangling beneath it. Clean cable management is essential.
Concealing Cables
- In-Wall Cable Routing: The cleanest look involves running cables behind the wall. This typically requires a UL-listed in-wall cable management kit or conduit, which prevents fire hazards. If you’re not comfortable cutting drywall and running electrical, hire a professional. As Dikfu’s senior technician, Marcus “The Mount Master” Thorne, always advises, “When in doubt about in-wall wiring, call an electrician. It’s a small investment for peace of mind and safety.”
- Cable Raceways/Concealers: These are channels that stick to your wall and can be painted to match. They’re a non-invasive way to hide cables, though not as seamless as in-wall routing.
- Cable Ties and Sleeves: For mounts that sit further from the wall (like full-motion), use cable ties or sleeves to bundle wires together neatly, preventing tangles and creating a cleaner look.
- Furniture Routing: If you have a media console beneath your TV, you can route cables behind it or through furniture designed for cable management.
Finishing Touches
- Some mounts come with paintable wall covers or decorative caps to hide screws and give a more polished appearance.
- Take the time to organize any peripheral devices and their cables for an uncluttered entertainment area.
Common Mistakes and How to Avoid Them
Even seasoned DIYers can make mistakes. Here are the most common pitfalls to watch out for:
- Ignoring Weight and Size Limits: This is the most dangerous mistake. Always double-check your TV’s specs against the mount’s capacity.
- Not Locating Studs (or Using Incorrect Anchors): Relying on drywall alone for anything but the lightest TVs is a recipe for disaster. Always find those studs, or use appropriate masonry anchors for brick/concrete.
- Incorrect Height Placement: A TV mounted too high causes neck strain. Aim for eye level when seated.
- Overtightening Bolts: This can strip screw threads, damage the wall, or warp the mount. Tighten firmly but avoid excessive force.
- Forgetting Cable Access: Before fully securing a fixed mount, think about how you’ll plug in new devices or access existing ports. Full-motion mounts offer easier access.
- Using the Wrong Drill Bit: Using a wood bit on masonry, or vice versa, will yield poor results and potentially damage your tools or wall.
Frequently Asked Questions (FAQ)
Q: Can I mount a flat screen TV on drywall without studs?
A: For most flat screen TVs, especially larger, heavier models, mounting directly into drywall without hitting studs is strongly discouraged as drywall alone cannot safely support the weight. While “studless” mounts exist for very light TVs, it’s always best practice to anchor into at least two wood studs, or use proper masonry anchors for brick or concrete walls. If studs are unavailable, consider professional installation or a freestanding TV stand for safety.
Q: What is the ideal height for a wall-mounted TV?
A: Generally, the center of your flat screen TV should be at eye level when you are seated in your primary viewing position. For most living rooms, this translates to the bottom of the TV being approximately 42 to 48 inches from the floor, but it ultimately depends on your seating height and personal comfort.
Q: Is it safe to run TV wires behind a wall?
A: Running TV wires behind a wall can be safe, but it must be done correctly using a UL-listed in-wall cable management kit or conduit. Simply fishing standard power cords through a wall cavity is a fire hazard and typically violates electrical codes. If you’re unsure, it’s always best to consult a qualified electrician or professional installer.
Q: Do all TV mounts fit all TVs?
A: No, not all TV mounts fit all TVs. Mounts are designed to accommodate specific TV sizes, weight capacities, and VESA mounting patterns. You must match your TV’s VESA pattern (the screw hole configuration on the back) and ensure the mount can safely support your TV’s weight and size.
Q: How long do TV mounts last?
A: A high-quality flat screen TV wall mount, made from durable materials like alloy steel and properly installed, can last 5 to 15 years or even longer. Full-motion mounts with more moving parts might show wear on those components sooner, while outdoor mounts may have a shorter lifespan due to exposure to the elements.
Q: Are expensive TV mounts worth it?
A: The “worth” of an expensive TV mount depends on your needs. Basic fixed mounts are very affordable and excellent for simple setups. More expensive full-motion or specialized mounts (like pull-down ones) offer greater flexibility, adjustability, and often superior build quality. If you need extensive movement, plan to mount in a tricky spot, or desire premium features, the extra investment in a higher-end mount can certainly be worth it for the added functionality, convenience, and peace of mind.
improve your Entertainment
Mounting your flat screen TV to the wall is an excellent way to modernize your space, free up valuable floor real estate, and enhance your viewing pleasure. By carefully considering the type of mount, understanding your TV’s specifications, and following a methodical installation process, you can achieve a secure and aesthetically pleasing setup.
Don’t let the thought of DIY installation intimidate you. With the insights and practical steps from Dikfu.com, you’re well-equipped to tackle this project with confidence. Take your time, measure twice (or thrice!), and don’t hesitate to enlist a helping hand. improve your living space and enjoy your favorite shows and movies like never before. Get started on your flat screen TV wall mount project today, and experience the Dikfu difference!
Install Your Flat Screen TV Wall Mount Safely
This guide provides a general framework for safely installing a flat screen TV wall mount. Always refer to your specific mount's instructions for detailed guidance.
Collect all necessary tools, including your flat screen TV wall mount kit, a stud finder, a level, an electric drill with appropriate bits, a socket wrench, measuring tape, pencil, and safety glasses. It is highly recommended to have a friend assist with lifting the TV for safety.
Before drilling, plan your TV's position. The center of the screen should ideally be at eye level when seated. For a 42-inch TV, the bottom is typically around 56 inches from the floor. Avoid direct sunlight or heat sources and ensure easy access to power outlets.
Use a stud finder to locate and mark the edges and center of at least two adjacent studs where the mount will be installed. For masonry walls, prepare for masonry anchors instead. Hold the wall mount bracket against the wall, use a level to ensure it's straight, and mark the exact drilling spots with a pencil. Drill pilot holes using the appropriate drill bit size for your lag bolts.
Align the wall bracket with your pilot holes, insert lag bolts (and wall anchors for masonry), and tighten them securely with a socket wrench until the mount is rock-solid. Lay your TV face down on a soft surface, locate the VESA mounting holes, and attach the vertical mounting arms from your kit using the provided screws and spacers, ensuring they are snug.
With a helper, carefully lift the TV and hook the mounting arms onto the wall bracket. Engage any locking mechanisms or safety screws immediately. Gently test the TV's stability by pushing it slightly. If you have a tilting or full-motion mount, adjust the tilt or swivel as needed to fine-tune your viewing angle.
Get our weekly buyer guide
Practical specs, not advice. Unsubscribe anytime.
I finally got around to mounting my 65-inch TV, and this guide was a lifesaver. I was a bit intimidated by the idea of a DIY installation, but the step-by-step process made it so much easier. My fixed mount looks super clean and really opened up the living room. Definitely recommend following these tips!
I’ve installed a few TV mounts over the years, but I still picked up some good pointers here. The emphasis on checking the VESA pattern was a good reminder, as I almost forgot to double-check that for my new OLED. It’s great to have a resource that covers the basics and some of the more advanced considerations for a solid home theater setup.
The advice on choosing the right mount type was helpful, especially understanding the difference between fixed and full-motion. I went with a tilting mount for my bedroom, but I found the part about finding studs a little vague. It took me a bit longer than expected to get it perfectly level, but it’s up there now.
This guide was exactly what I needed! I’ve always wanted to mount my TV to reclaim some space, and the detailed explanation of different mount types helped me confidently choose a full-motion mount. The installation went smoothly, and now I can adjust my TV for perfect viewing from anywhere in the room. So happy with the result!