A tiltable TV wall mount improves your TV viewing experience by allowing the screen to pivot vertically, typically downwards, to reduce glare and optimize viewing angles. This type of mount is ideal for TVs mounted above eye level, such as over a fireplace or in a bedroom, ensuring comfortable viewing and a sleek aesthetic. It offers a balance of functionality and design, enhancing your home entertainment system.
What is a Tiltable TV Wall Mount?
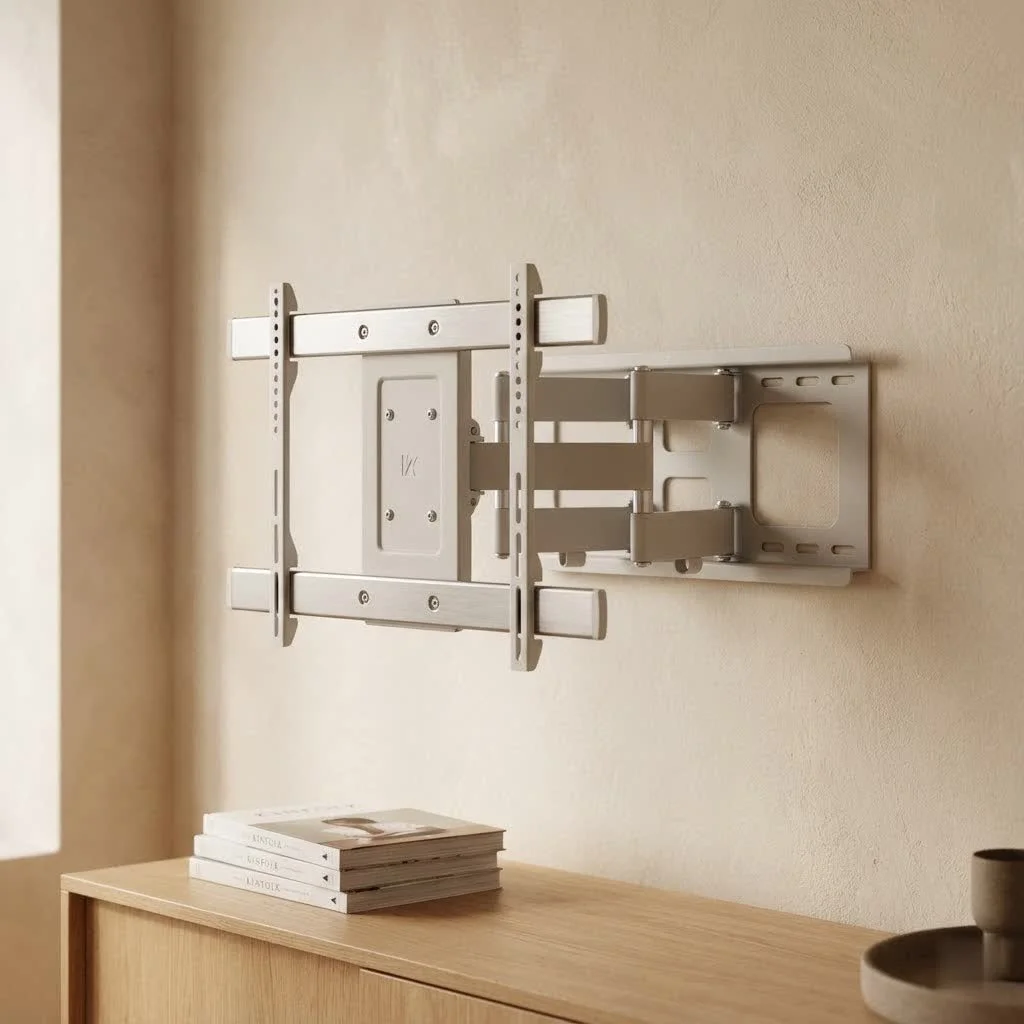
A tiltable TV wall mount, also known as a tilting TV bracket, allows your television to pivot vertically, usually downwards, at a set angle. Unlike a fixed mount that holds the TV flat against the wall, or a full-motion mount that offers extensive articulation, a tilting mount specifically adjusts the vertical angle. This feature is particularly useful for optimizing your viewing angle, especially when your TV is mounted higher than eye level, such as above a fireplace or in a bedroom where you might be watching from a reclined position. For browse all tv mounts articles on this site.
Why Choose a Tiltable TV Wall Mount? Benefits You Can’t Ignore
The advantages of opting for a tiltable TV wall mount are numerous and often underestimated. From enhanced viewing comfort to reducing eye strain and glare, these mounts offer significant improvements over their fixed counterparts.
Improved Viewing Angles
When your TV is mounted high, a fixed mount forces you to look up, which can lead to neck discomfort over time. A tilting mount allows you to angle the screen downwards, directing the picture directly towards your seated or reclined position. This simple adjustment makes a dramatic difference in viewing comfort, ensuring everyone in the room has a great view without straining.
Glare Reduction
One of the most common complaints with wall-mounted TVs is glare from windows or ambient lighting. A tiltable TV wall mount is a major upgrade here. By tilting the screen slightly, you can often redirect reflections away from your eyes, drastically improving picture clarity and reducing the need to draw curtains or adjust lights every time you want to watch TV. This is especially useful in brightly lit rooms or those with multiple light sources.
Space-Saving Design
While offering adjustability, tiltable mounts still maintain a relatively low profile compared to bulkier full-motion mounts. They typically sit closer to the wall than articulating mounts, giving your room a cleaner, more streamlined look while still providing essential viewing flexibility. This makes them ideal for areas where space is a premium but some angle adjustment is still desired.
Enhanced Aesthetics
|
Our Picks for the Best TV Mount in 2026
As an Amazon Associate I earn from qualifying purchases.
|
||
| Num | Product | Action |
|---|---|---|
| 1 | MOUNTUP Full Motion TV Wall Mount for Most 26-60 Inch TVs, Max VESA 400x400mm Wall Mount TV Bracket with Swivel Tilting Extension Level Adjustment for LED LCD Flat Curved TVs Up to 77 LBS, MU0018 |

|
| 2 | Mounting Dream TV Wall Mount for Most 37-75 Inch TVs, Universal Tilt TV Mount Fit 16\", 18\", 24\" Stud with Loading Capacity 132lbs, Max Vesa 600 x 400mm, Low Profile Flat Wall Mount TV Bracket |
|
| 3 | Magnetic Monitor Wall Mount for Steel Surfaces, Fits 13 to 34 Inch Screens, Holds up to 22 lbs, VESA 75/100 Compatible Wall Mount for Computer and TV Monitor, No-Drill Installation with All Screws |
|
| 4 | Pipishell Full Motion TV Wall Mount for Echo Show 21/15 and 13-43 Inch Flat Curved Screen TVs & Monitors, Max VESA 200x200mm up to 44lbs, TV Mount Wall Bracket with Rotation Swivel Tilt Extension |
|
| 5 | USX Mount Full Motion TV Wall Mount for Most 42-90 inch Flat Screen/LED/4K, TV Mount Bracket Dual Swivel Articulating Tilt 6 Arms, Max 16\" Wood Studs, VESA 600x400mm, Holds up to 132lbs |
|
| 6 | Perlegear Full Motion TV Wall Mount for Most 42–86 inch Flat Curved TVs up to 132 lbs, 12″/16″ Wood Studs, Bracket with Articulating Arms, Swivel, Tool-Free Tilt, Max VESA 600x400mm PGLF12 |
|
| 7 | monTEK Motorized Ceiling TV Mount for 43-86 Inch TVs, Heavy-Duty 121lbs (4X Load Tested), Off-Center VESA Compatible, Electric Flip Down with Remote/App/Voice Control, Fits Flat & Pitched Roof |
|
| 8 | USX MOUNT Full Motion TV Wall Mount for Most 32-70 inch TVs up to 99 lbs, Wall Mount Bracket with Dual Articulating Arms, Swivel, Tilt, Max VESA 400x400mm, TV Mount Fits 12”/16” Wood Studs |
|
| 9 | Mounting Dream TV Wall Mount for 32-65 Inch Television,Mount with Swivel and Tilt, Full Motion Bracket with Articulating Dual Arms, Fits 16inch Studs, Max VESA 400X400 mm, 99lbs, MD2380 |
|
| 10 | Amazon Basics Full Motion Articulating TV Wall Mount, with Swivel and Tilt, for 26\" to 55\" TVs and Flat Panels up to 80 Lbs, VESA Compatible, Black |
|
Mounting your TV on the wall instantly elevates the look of any room, making it feel more modern and spacious. A tiltable mount enhances this further by allowing you to fine-tune the TV’s angle, ensuring it looks perfectly integrated into your décor, not just a flat screen stuck on a wall. It’s about creating a polished, intentional design.
Easier Cable Access
While the primary function of a tiltable mount is viewing adjustment, the ability to tilt the TV forward often provides easier access to the ports on the back of the television. This makes plugging in new devices, swapping HDMI cables, or performing maintenance much less of a hassle than with a fixed mount where access can be extremely limited.
Choosing the Right Tiltable TV Wall Mount for Your Setup
Selecting the perfect tiltable TV wall mount requires careful consideration of several factors to ensure compatibility, safety, and optimal performance. Don’t just grab the first one you see; a little planning goes a long way.
TV Size and Weight Compatibility
The most critical factor is ensuring the mount can safely support your TV.
- Weight Capacity: Every mount has a maximum weight it can hold. Check your TV’s manual for its exact weight and choose a mount with a weight capacity that exceeds it. It’s always better to have some buffer.
- VESA Pattern: VESA (Video Electronics Standards Association) is a standard used for TV and mount compatibility. It refers to the four-hole pattern on the back of your TV. Measure the horizontal and vertical distance between these holes (e.g., 400x400mm) and ensure your chosen mount supports this VESA pattern. Most mounts are designed to accommodate a range of VESA patterns, but always double-check.
Wall Type and Stud Spacing
Before purchasing, you need to know what kind of wall you’ll be mounting to.
- Wood Studs: The most secure option. You’ll need to locate your wall studs, typically 16 or 24 inches apart, and ensure your mount’s horizontal mounting plate can span at least two studs for maximum stability.
- Concrete/Brick: Requires specialized concrete anchors and a hammer drill. Most mounts come with hardware for concrete, but ensure it’s robust.
- Metal Studs/Drywall Only: Mounting directly into drywall or light-gauge metal studs is generally NOT recommended for heavier TVs. If unavoidable, consult a professional or use heavy-duty toggle anchors designed for high loads, but proceed with extreme caution. “When in doubt, always over-engineer for safety. A flimsy installation is an accident waiting to happen,” advises Dikfu’s lead installer, Marcus Thorne.
Tilt Range and Profile
Consider how much tilt you actually need and how close you want the TV to sit to the wall.
- Tilt Range: Most tiltable mounts offer a tilt range of -5 to -15 degrees. Determine if this range is sufficient for your viewing needs and to eliminate glare.
- Low Profile: If a super-sleek look is important, compare the distance mounts will hold your TV from the wall. Some tilt mounts offer an impressively slim profile, often just 1-2 inches from the wall.
Cable Management Options
Think about how you’ll manage cables.
- Some mounts feature open designs or include clips and ties for neat cable routing.
- Consider running cables inside the wall for the cleanest look, but this requires additional tools and possibly professional help.
Step-by-Step: Installing Your Tiltable TV Wall Mount Safely and Correctly
Installing a tiltable TV wall mount is a DIY project many homeowners can tackle, but it requires precision, patience, and the right tools. Always prioritize safety!
Essential Tools and Materials Checklist
Before you begin, gather these items:
- The tiltable TV wall mount kit (including all hardware)
- Drill with appropriate bit sizes (wood, concrete, or pilot bits)
- Stud finder
- Level
- Pencil or marker
- Measuring tape
- Phillips head screwdriver
- Socket wrench or adjustable wrench
- Safety glasses
- Helper (highly recommended, especially for larger TVs)
The Installation Process
- Read the Manual: This is non-negotiable. Every mount is slightly different. Familiarize yourself with your specific mount’s instructions, hardware, and weight limits.
- Locate and Mark Studs: Use your stud finder to pinpoint the center of at least two adjacent wall studs. Mark their locations with a pencil. If mounting to concrete, decide on your desired wall plate location.
- Determine TV Height: With a helper, hold your TV against the wall at your desired viewing height. Mark the bottom and center of the TV. A good rule of thumb is to have the center of the screen at eye level when seated. to account for the mount’s dimensions.
- Position and Level the Wall Plate: Hold the mount’s wall plate against the wall, aligning it with your stud marks and desired TV height. Use a level to ensure it’s perfectly horizontal. Mark the drill holes accurately.
- Drill Pilot Holes: Using the appropriate drill bit (smaller than your lag bolts for wood studs), drill pilot holes into the center of your marked stud locations. For concrete, use a hammer drill and masonry bit for the anchor holes.
- Secure the Wall Plate: Mount the wall plate to the wall using the supplied lag bolts (for wood studs) or concrete anchors. Tighten them securely, but do not overtighten, which could strip the wood or crack the concrete. Use a socket wrench for best results.
- Attach Brackets to TV: Carefully lay your TV face down on a clean, soft surface (like a blanket on a table). Attach the vertical mounting brackets to the back of the TV using the screws, washers, and spacers provided. Ensure you use the correct screw length – too long can damage internal components.
- Hang the TV: This is where your helper is crucial. Carefully lift the TV and hook the brackets onto the wall plate. Most tiltable mounts have a locking mechanism (e.g., pull straps or screws) to secure the TV to the wall plate. Engage these mechanisms immediately.
- Adjust and Tilt: Once secure, test the tilting mechanism. Adjust the angle to your preferred viewing position. Many tilt mounts have knobs or levers to lock the tilt angle in place.
Smart Cable Management and Enhancing Your Space
A beautiful wall-mounted TV can quickly look messy with dangling cables. Here’s how to achieve a clean, professional finish:
In-Wall Cable Concealment
For the ultimate clean look, run your cables inside the wall. This involves cutting small holes in the drywall behind the TV and near the floor for an outlet, using low-voltage cable plates. “Proper in-wall cable management not only looks fantastic but also creates a safer environment by eliminating tripping hazards,” notes Marcus Thorne. Always ensure you use appropriate in-wall rated cables and avoid running power cables through the same conduit as signal cables to prevent interference, unless using a specifically designed in-wall power extension kit.
Cable Management Covers
If in-wall routing isn’t an option, paintable cable raceways or covers can discreetly hide wires. These adhere to the wall and can be painted to match your wall color, making them almost invisible.
Utilize Cable Ties and Sleeves
Even with in-wall or raceway solutions, you might have short runs of cable near the TV or AV equipment. Use hook-and-loop cable ties or flexible cable sleeves to bundle these wires neatly, preventing tangles and improving the overall aesthetic.
Common Installation Pitfalls and How to Avoid Them
Even with the best intentions, mistakes can happen. Here’s how to prevent common issues when installing your tiltable TV wall mount:
- Ignoring Studs/Anchors: Attempting to mount a heavy TV directly into drywall without proper stud attachment or heavy-duty anchors is a recipe for disaster. Always find your studs or use appropriate, high-capacity anchors for concrete.
- Incorrect Height Calculation: Nothing is more frustrating than mounting your TV only to realize it’s too high or low. Double-check your measurements and consider your primary viewing position before drilling.
- Overtightening Screws: This can strip pilot holes, damage your TV’s VESA threading, or crack the wall. Tighten until snug, then give an extra quarter turn.
- Uneven Mount: A crooked TV is an eyesore. Use a reliable level at every stage of mounting the wall plate.
- Forgetting Cable Access: Plan for where your cables will go before the TV is on the wall. It’s much harder to route them afterward.
Frequently Asked Questions About Tiltable TV Wall Mounts
Q: Can a tiltable TV wall mount be installed on any wall?
A: While most walls can support a tiltable TV wall mount, the installation method differs significantly. Wood stud walls are generally the easiest and most secure, followed by concrete or brick walls which require specific anchors. Drywall-only installations are usually not recommended for safety reasons, especially for heavier TVs.
Q: How much tilt do I really need?
A: The ideal tilt depends on your viewing height relative to the TV. For TVs mounted slightly above eye level, a modest 5-10 degree tilt is often sufficient. If your TV is significantly higher, like above a fireplace, a larger tilt (up to 15 degrees or more) might be necessary to direct the screen towards your seating area and combat glare.
Q: Are tiltable mounts good for small TVs too?
A: Absolutely! While larger TVs often benefit more from glare reduction and viewing angle correction, a tiltable TV wall mount can still enhance the experience for smaller screens in bedrooms or kitchens, providing flexibility for various viewing positions.
Q: What’s the difference between a tiltable mount and a full-motion mount?
A: A tiltable mount primarily offers vertical (up/down) angle adjustment, keeping the TV relatively close to the wall. A full-motion (or articulating) mount allows for tilting, swiveling (left/right), and extending the TV away from the wall, offering maximum flexibility but typically having a larger profile and higher cost.
Q: Do all tiltable TV mounts come with leveling adjustments?
A: Many modern tiltable TV wall mount designs include post-installation leveling adjustments, allowing for minor rotations (usually +/- 3 degrees) even after the TV is hung. This is a very convenient feature if your wall plate isn’t perfectly level. Check the product specifications if this feature is important to you.
Conclusion
A tiltable TV wall mount is an excellent investment for anyone looking to optimize their viewing experience, reduce glare, and achieve a sleek, space-saving aesthetic in their home. By understanding the benefits, carefully choosing the right mount for your TV and wall type, and following our expert installation guide, you can confidently improve your entertainment area. precision and safety are paramount. Take your time, gather the right tools, and don’t hesitate to ask for an extra set of hands. Once your tiltable TV wall mount is securely in place and perfectly angled, you’ll wonder how you ever watched TV without it. Now, go forth and enjoy your perfectly positioned, glare-free viewing!
Frequently Asked Questions
Can a tiltable TV wall mount be installed on any wall type?
Yes, most walls can support a tiltable TV wall mount, but the installation method varies. Wood stud walls are the most secure, while concrete or brick walls require specific anchors. Drywall-only installations are generally not recommended for safety, especially for heavier TVs.
How much tilt range is typically needed for a TV wall mount?
The ideal tilt depends on your TV's height relative to your viewing position. For TVs slightly above eye level, a 5-10 degree tilt is often sufficient. If your TV is significantly higher, such as above a fireplace, a larger tilt of up to 15 degrees or more may be necessary to direct the screen towards your seating area and combat glare effectively.
Are tiltable mounts suitable for small televisions?
Absolutely. While larger TVs often benefit more from glare reduction and viewing angle correction, a tiltable TV wall mount can still enhance the experience for smaller screens in areas like bedrooms or kitchens, providing valuable flexibility for various viewing positions.
What is the main difference between a tiltable and a full-motion TV mount?
A tiltable mount primarily offers vertical (up/down) angle adjustment, keeping the TV relatively close to the wall. In contrast, a full-motion (or articulating) mount allows for tilting, swiveling (left/right), and extending the TV away from the wall, providing maximum flexibility but typically having a larger profile and higher cost.
Do all tiltable TV mounts offer post-installation leveling adjustments?
Many modern tiltable TV wall mount designs include post-installation leveling adjustments, allowing for minor rotations, typically +/- 3 degrees, even after the TV is hung. This feature is very convenient if your wall plate isn't perfectly level, so check product specifications if it's important to you.
Install a Tiltable TV Wall Mount
This guide provides step-by-step instructions for safely and correctly installing a tiltable TV wall mount, ensuring optimal viewing and a secure setup.
Begin by thoroughly reading your mount's manual to understand specific instructions and weight limits. Use a stud finder to locate and mark the center of at least two adjacent wall studs, typically 16 or 24 inches apart, or determine your desired wall plate location for concrete walls.
With a helper, hold your TV against the wall at your desired viewing height, marking the bottom and center. A good rule of thumb is to have the center of the screen at eye level when seated. Position the mount's wall plate, align it with your stud marks, use a level to ensure it's perfectly horizontal, and accurately mark the drill holes.
Using the appropriate drill bit (smaller than your lag bolts for wood studs), drill pilot holes into the center of your marked stud locations. For concrete, use a hammer drill and masonry bit for anchor holes. Mount the wall plate to the wall using the supplied lag bolts or concrete anchors, tightening them securely but avoiding overtightening.
Carefully lay your TV face down on a clean, soft surface. Attach the vertical mounting brackets to the back of the TV using the provided screws, washers, and spacers, ensuring correct screw length. With your helper, carefully lift the TV and hook the brackets onto the wall plate, immediately engaging any locking mechanisms to secure the TV.
Once the TV is securely hung, test the tilting mechanism. Adjust the angle to your preferred viewing position to reduce glare and improve comfort. Many tilt mounts have knobs or levers to lock the tilt angle in place, ensuring your TV stays perfectly positioned.
Get our weekly buyer guide
Practical specs, not advice. Unsubscribe anytime.
Upgraded from a fixed mount to this tiltable one and I’m so glad I did. The difference in viewing comfort, especially when I’m watching from different spots in the room, is noticeable. It really helps optimize the viewing angle and makes the whole home entertainment system feel more professional. A must-have for any serious setup.
I finally got around to mounting my TV above the fireplace, and this tiltable mount was a lifesaver. The ability to pivot it downwards made a huge difference in reducing glare from the windows. It was surprisingly easy to install too, even for someone not super handy. Definitely recommend for anyone with a high-mounted TV.
This tilting TV bracket is exactly what I needed for my bedroom TV. It’s mounted pretty high on the wall, and being able to adjust the angle makes watching shows in bed so much more comfortable. The build quality feels solid, and it holds my 65-inch TV without any issues. Great value for the price.
The tilt feature works well for my living room setup, especially since our couch is a bit far back. However, I found the instructions a little confusing in some parts, and it took me longer than expected to get it perfectly level. Once it’s up, it’s fine, but the installation could be smoother.