A swivel TV mount, also known as a full-motion or articulating mount, offers unparalleled flexibility by allowing you to adjust your television horizontally, vertically, and extend it from the wall. This type of mount is ideal for open-plan living spaces or rooms with multiple viewing areas, providing dynamic adjustability that fixed or tilting mounts cannot match, ensuring optimal viewing from almost anywhere in the room.
Imagine cooking in the kitchen while watching TV in the living room, or ensuring everyone has the best seat in a multi-zone setup. A swivel TV mount solves these common viewing dilemmas, making your television adaptable to your lifestyle rather than restricting your viewing angles.
Why Choose a Swivel TV Mount? The Benefits You Can’t Ignore
Swivel TV mounts are a popular choice due to their unparalleled versatility and enhanced viewing comfort. These mounts provide a range of movements that significantly improve your viewing experience:
- Swivel Your TV Horizontally: Turn your TV left or right, often up to 90 degrees or more, to face different areas of a room. This is perfect for open-plan layouts.
- Tilt for Optimal Glare Reduction: Adjust the screen vertically to eliminate reflections from windows or lighting, ensuring a clear picture and reducing neck and eye strain.
- Extend and Retract: Pull your TV away from the wall to get closer to the action, or push it back for a low-profile look when not in use. This is useful for corner installations.
- Level Your Screen: Many swivel mounts include a post-installation leveling feature, allowing for minor rotational adjustments to ensure your TV is perfectly straight.
“The beauty of a swivel TV mount isn’t just its movement, but the freedom it gives you,” says Marcus Thorne, a veteran AV installer and content creator for Dikfu.com. “It transforms a static screen into a dynamic centerpiece, adaptable to any activity or audience in your home.”
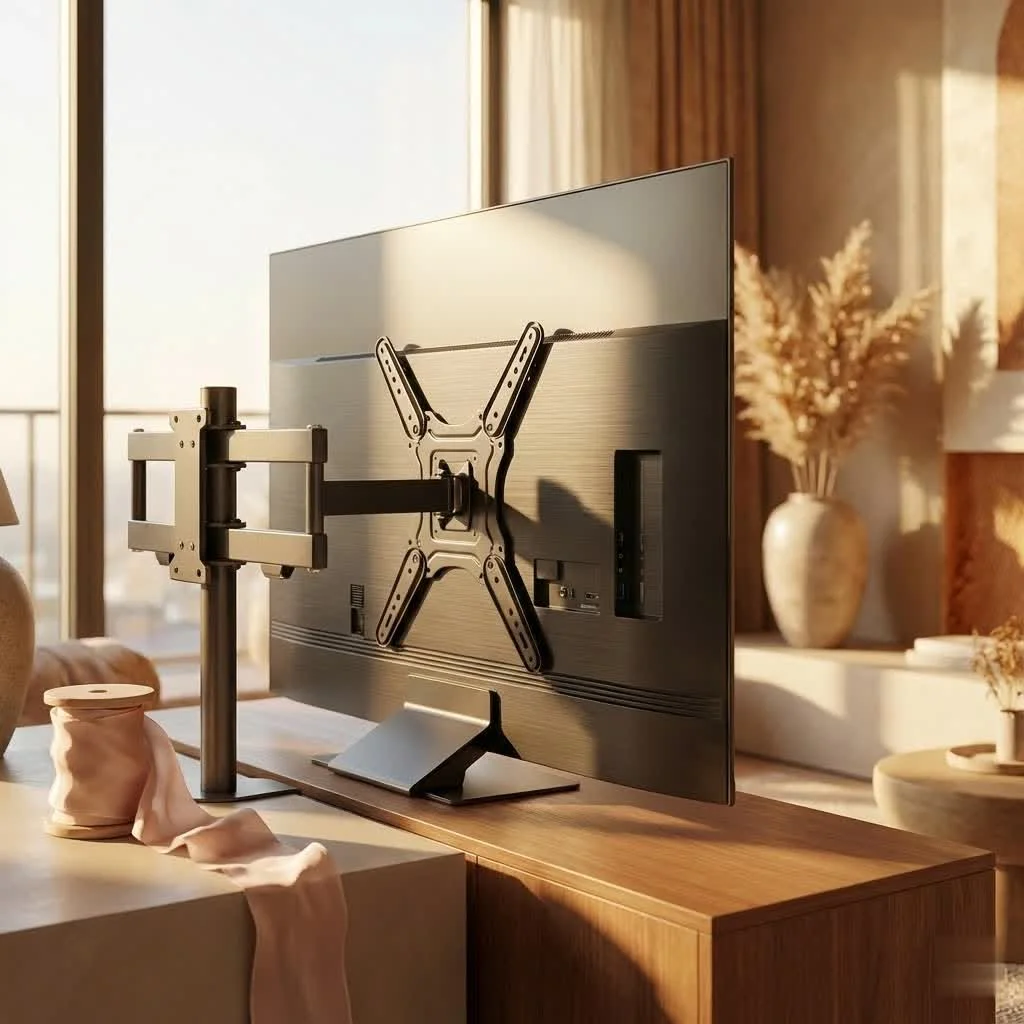
Understanding Swivel Mount Types: Finding Your Perfect Match
While “swivel TV mount” often refers to full-motion capabilities, the primary type you’ll encounter is the full-motion or articulating TV mount.
These mounts typically feature one or two articulating arms that allow the TV to extend significantly from the wall, swivel left and right, and tilt up and down. The number of arms can impact stability and extension length:
- Single-Arm Swivel Mounts: Generally more compact and suitable for smaller to medium-sized TVs (e.g., 17-50 inches). They offer good swivel and tilt but might have a more limited extension.
- Dual-Arm Swivel Mounts: Provide greater stability and support for larger, heavier TVs (e.g., 40-90+ inches). These mounts typically offer more extensive reach from the wall and a broader range of swivel. They are the go-to for maximizing flexibility and ensuring robust support.
Some mounts might also offer specialized swivel functions, like those designed specifically for corner installations, which are tailored to maximize viewing angles in challenging spaces.
Choosing the Right Swivel TV Mount for Your Setup
Selecting the perfect swivel TV mount is crucial for both safety and functionality. It’s not a one-size-fits-all situation, and several factors must be carefully considered.
TV Size and Weight
|
Our Picks for the Best TV Mount in 2026
As an Amazon Associate I earn from qualifying purchases.
|
||
| Num | Product | Action |
|---|---|---|
| 1 | USX Mount Full Motion TV Wall Mount for Most 42-90 inch Flat Screen/LED/4K, TV Mount Bracket Dual Swivel Articulating Tilt 6 Arms, Max 16\" Wood Studs, VESA 600x400mm, Holds up to 132lbs |

|
| 2 | USX MOUNT Full Motion TV Wall Mount for Most 32-70 inch TVs up to 99 lbs, Wall Mount Bracket with Dual Articulating Arms, Swivel, Tilt, Max VESA 400x400mm, TV Mount Fits 12”/16” Wood Studs |
|
| 3 | Mounting Dream TV Wall Mount for 32-65 Inch Television,Mount with Swivel and Tilt, Full Motion Bracket with Articulating Dual Arms, Fits 16inch Studs, Max VESA 400X400 mm, 99lbs, MD2380 |
|
| 4 | MOUNTUP Full Motion TV Wall Mount for Most 26-60 Inch TVs, Max VESA 400x400mm Wall Mount TV Bracket with Swivel Tilting Extension Level Adjustment for LED LCD Flat Curved TVs Up to 77 LBS, MU0018 |
|
| 5 | Magnetic Monitor Wall Mount for Steel Surfaces, Fits 13 to 34 Inch Screens, Holds up to 22 lbs, VESA 75/100 Compatible Wall Mount for Computer and TV Monitor, No-Drill Installation with All Screws |
|
| 6 | Amazon Basics Full Motion Articulating TV Wall Mount, with Swivel and Tilt, for 26\" to 55\" TVs and Flat Panels up to 80 Lbs, VESA Compatible, Black |
|
| 7 | Perlegear Full Motion TV Wall Mount for Most 42–86 inch Flat Curved TVs up to 132 lbs, 12″/16″ Wood Studs, Bracket with Articulating Arms, Swivel, Tool-Free Tilt, Max VESA 600x400mm PGLF12 |
|
| 8 | monTEK Motorized Ceiling TV Mount for 43-86 Inch TVs, Heavy-Duty 121lbs (4X Load Tested), Off-Center VESA Compatible, Electric Flip Down with Remote/App/Voice Control, Fits Flat & Pitched Roof |
|
| 9 | Mounting Dream TV Wall Mount for Most 37-75 Inch TVs, Universal Tilt TV Mount Fit 16\", 18\", 24\" Stud with Loading Capacity 132lbs, Max Vesa 600 x 400mm, Low Profile Flat Wall Mount TV Bracket |
|
| 10 | Pipishell Full Motion TV Wall Mount for Echo Show 21/15 and 13-43 Inch Flat Curved Screen TVs & Monitors, Max VESA 200x200mm up to 44lbs, TV Mount Wall Bracket with Rotation Swivel Tilt Extension |
|
This is paramount. Every swivel TV mount has specific weight and size limits.
- Check Your TV’s Manual: Locate the exact weight of your television and its screen size.
- Match Mount Specifications: Ensure the mount you choose explicitly states it can support your TV’s weight and falls within its recommended screen size range. Never exceed the stated weight capacity; it’s a recipe for disaster.
VESA Compatibility
VESA (Video Electronics Standards Association) is a set of standards for mounting interfaces. It’s the pattern of screw holes on the back of your TV.
- Find Your VESA Pattern: Measure the horizontal and vertical distance between the mounting holes on the back of your TV (in millimeters), or check your TV manual. Common VESA patterns include 200x200mm, 400x400mm, or 600x400mm.
- Verify Mount Compatibility: Your chosen swivel TV mount must support your TV’s VESA pattern. Most good quality mounts will list the VESA patterns they accommodate.
Wall Type
The type of wall you’re mounting to dictates the fasteners and installation method.
- Wood Stud Walls: The most common and secure method involves anchoring the mount directly into wood studs behind your drywall. This provides excellent support for even the largest TVs.
- Concrete or Brick Walls: These require specialized concrete anchors and a powerful hammer drill. It’s a very sturdy option but demands different tools and techniques.
- Metal Stud Walls: While possible, mounting to metal studs can be more complex and may require additional reinforcement or toggle bolts, depending on the stud gauge. Consulting a professional is often recommended.
- Drywall (No Studs): For very small, lightweight TVs, specific drywall anchors (like toggle bolts or heavy-duty anchors) might be used, but this is generally NOT recommended for swivel TV mounts due to the dynamic forces involved with moving the TV. Always aim for studs or a solid wall.
Viewing Angles and Extension Needs
Consider how far you need your TV to extend from the wall and how much swivel you require.
- Extension Length: Measure the distance from your desired viewing positions to the wall. Ensure the mount’s extension arm is long enough to achieve those angles.
- Swivel Range: Check the mount’s specifications for its maximum swivel angle (e.g., ±45°, ±60°, or full 90° in each direction). A wider range offers more flexibility, especially in corners or large rooms.
Step-by-Step Installation: Mounting Your Swivel TV Mount Safely
Installing a swivel TV mount might seem daunting, but with the right tools, careful planning, and a methodical approach, it’s a DIY project you can confidently tackle. Safety is paramount here, so take your time and follow these steps.
Tools You’ll Need (Checklist)
- Drill (with appropriate drill bits for pilot holes)
- Stud Finder (essential for wood stud walls)
- Level
- Measuring Tape
- Pencil
- Phillips Head Screwdriver / Wrench
- Safety Glasses
- Gloves (optional, but recommended for handling heavy items)
- A helper (highly recommended, especially for larger TVs!)
Pre-Installation Checks
- Read the Manual: Seriously, every mount is slightly different. Read the instructions that came with your specific swivel TV mount before you start.
- Verify Wall Type and Location: Use your stud finder to locate at least two sturdy wood studs. Mark their centers accurately. If mounting to concrete, ensure you have the correct anchors and drill bits.
- Determine TV Height: Decide on the ideal viewing height. A good rule of thumb is for the center of the TV to be at eye level when you’re seated.
Locating Studs and Drilling Pilot Holes
- Mark Stud Centers: Once you’ve located the studs with your stud finder, use your pencil to mark the exact center of each stud where your mount’s wall plate will attach.
- Position the Wall Plate: Hold the mount’s wall plate against the wall at your desired height. Use a level to ensure it’s perfectly horizontal. Mark the drilling points through the holes on the wall plate that align with your stud marks.
- Drill Pilot Holes: Use the recommended drill bit size (as per your mount’s manual) to drill pilot holes at your marked spots. Drill deep enough to accommodate the lag bolts.
Attaching the Wall Plate
- Align and Secure: Position the wall plate over the pilot holes.
- Insert Lag Bolts: Carefully insert the lag bolts (or concrete anchors if applicable) through the wall plate and into the pilot holes.
- Tighten Securely: Use a wrench or socket set to tighten the lag bolts. Do not overtighten, as this can strip the wood, but ensure the wall plate is firmly and securely fastened to the wall. It should not wiggle or shift.
Mounting the TV Brackets
- Attach to TV: Lay your TV face down on a soft, clean surface (like a blanket on a table).
- Align Brackets: Align the TV brackets (the parts that attach to the back of the TV) with the VESA mounting holes.
- Secure with Screws: Use the appropriate screws, washers, and spacers provided with your mount (or TV) to firmly attach the brackets to the TV. Do not overtighten.
Hanging Your TV
This is where your helper comes in!
- Lift Carefully: With your helper, carefully lift the TV.
- Engage Mount: Guide the TV brackets onto the wall plate or arms of the swivel TV mount, following the specific engagement mechanism of your model (e.g., hooks, clips, or rails). Listen for any clicks or feel for a secure connection.
- Secure Safety Locks: Most mounts have safety screws or straps to prevent the TV from accidentally being lifted off the mount. Engage these immediately.
Adjustments and Testing
- Test Movement: Gently test the swivel, tilt, and extension functions to ensure smooth operation and that all parts move as expected.
- Level Check: Use your level to confirm the TV is perfectly horizontal. Most swivel mounts allow for minor post-installation leveling adjustments.
- Final Tightening: Double-check all bolts and screws for tightness, but not to overtighten.
Cable Management and Aesthetics: A Clean Finish
A professional-looking TV setup isn’t just about the mount; it’s also about hiding those unsightly cables. Good cable management elevates your entire entertainment space.
- Integrated Cable Management: Many swivel TV mounts feature built-in cable clips or channels along their arms. Utilize these to route your HDMI, power, and audio cables neatly.
- Cable Sleeves and Ties: Use cable sleeves or Velcro ties to bundle cables together, preventing tangles and creating a cleaner look.
- In-Wall Cable Management Kits: For the ultimate sleek look, consider an in-wall cable management kit. These involve routing cables behind the drywall, requiring a bit more effort but yielding an invisible setup. Always ensure local electrical codes are followed, especially for power cables.
- Concealers: If in-wall routing isn’t an option, paintable cable concealers can be applied to the wall surface to blend cables seamlessly.
Common Mistakes and How to Avoid Them
Even seasoned DIYers can make mistakes. Here are some common pitfalls when installing a swivel TV mount and how to steer clear of them:
- Ignoring Weight/Size Limits: Trying to mount a TV that’s too heavy or too large for the mount is a recipe for disaster. Always check specs.
- Skipping the Stud Finder: Mounting into drywall without anchoring to a stud is a common and dangerous mistake. Your TV will fall.
- Overtightening Screws: This can strip screw threads or damage your wall studs or TV frame. Tighten until snug and secure, then stop.
- Uneven Installation: A crooked TV is an eyesore. Use a level meticulously during installation. Many mounts offer post-installation leveling for minor corrections.
- Poor Cable Management: Leaving a tangle of wires detracts from the clean look of a mounted TV. Plan your cable routes from the start.
- Not Having a Helper: Larger TVs are heavy and awkward. Don’t risk injury or damage by trying to lift and hang it alone.
Longevity and Maintenance Tips for Your Swivel TV Mount
Once your swivel TV mount is installed, a little routine care can ensure it functions perfectly for years to come.
- Regular Dusting: Dust can accumulate in the moving parts. A quick wipe-down with a microfiber cloth helps keep things clean.
- Check Fasteners Periodically: Every 6-12 months, gently check that all lag bolts and screws are still snug. Vibrations or settling can sometimes loosen them slightly.
- Lubrication (If Applicable): Some older or heavy-duty mounts might benefit from a very light application of silicone-based lubricant to hinges or articulating points if they start to feel stiff. Consult your mount’s manual first, as many modern mounts are maintenance-free.
- Avoid Excessive Force: While designed for movement, avoid yanking or forcefully pushing your TV. Gentle, controlled movements will preserve the mount’s mechanisms.
Frequently Asked Questions About Swivel TV Mounts
Q1: Is a swivel TV mount the same as a full-motion TV mount?
A1: Yes, “swivel TV mount” is often used interchangeably with “full-motion TV mount” or “articulating TV mount.” These terms all describe a mount that allows for extensive movement, including swiveling left/right, tilting up/down, and extending away from the wall.
Q2: Can I install a swivel TV mount myself, or do I need a professional?
A2: Many homeowners can install a swivel TV mount themselves with the right tools and careful adherence to instructions. However, if you’re uncomfortable with power tools, dealing with wall types other than wood studs, or have a very large and heavy TV, hiring a professional installer is always a safe and recommended option.
Q3: What is VESA, and why is it important for a swivel TV mount?
A3: VESA refers to the standardized pattern of mounting holes on the back of your television. It’s crucial because your swivel TV mount must have a bracket that matches your TV’s VESA pattern to ensure proper and secure attachment. You can find your TV’s VESA size in its manual or by measuring the holes.
Q4: How far can a swivel TV mount extend from the wall?
A4: The extension length of a swivel TV mount varies significantly by model. Compact mounts might extend only a few inches, while larger, heavy-duty full-motion mounts can extend 20-30 inches or more, offering considerable flexibility in positioning your screen.
Q5: Can a swivel TV mount be installed on any wall?
A5: The most secure installations are typically on wood stud walls or concrete/brick walls. Mounting to drywall without hitting a stud is generally not recommended for swivel mounts due to the weight and dynamic forces involved. Always verify your wall type and use appropriate anchors and techniques.
Unlock Your TV’s Full Potential with a Swivel TV Mount
There you have it – the comprehensive guide to understanding, choosing, and installing your very own swivel TV mount. This isn’t just about putting a TV on the wall; it’s about transforming your living space, enhancing your viewing pleasure, and bringing a new level of versatility to your home entertainment. By following these expert tips from Dikfu.com, you’re not just installing a mount; you’re investing in a more adaptable, comfortable, and aesthetically pleasing way to enjoy your screen. So go ahead, measure twice, drill once, and get ready to experience your TV like never before!
Install a Swivel TV Mount Safely
This guide provides step-by-step instructions for safely installing a swivel TV mount, ensuring proper placement and secure attachment to your wall.
Before starting, read your mount's manual thoroughly, as every model is slightly different. Use a stud finder to locate at least two sturdy wood studs and mark their centers accurately. Determine the ideal TV height, aiming for the center of the TV to be at eye level when seated.
Mark the exact center of each stud where the mount's wall plate will attach. Hold the wall plate against the wall at your desired height, use a level to ensure it's horizontal, and mark the drilling points. Drill pilot holes at these marked spots using the drill bit size recommended in your mount's manual, ensuring they are deep enough for the lag bolts.
Position the wall plate over the pilot holes and carefully insert the lag bolts (or concrete anchors if applicable). Use a wrench or socket set to tighten the lag bolts until the wall plate is firmly and securely fastened to the wall, without overtightening to avoid stripping the wood.
Lay your TV face down on a soft surface and align the TV brackets with the VESA mounting holes. Secure them firmly with the appropriate screws, washers, and spacers. With a helper, carefully lift the TV and guide the brackets onto the wall plate, engaging the mount's specific mechanism. Immediately secure any safety locks to prevent accidental dislodgement.
Gently test the swivel, tilt, and extension functions to ensure smooth operation. Use a level to confirm the TV is perfectly horizontal, making minor post-installation adjustments if needed. Finally, double-check all bolts and screws for tightness, being careful not to overtighten.
Get our weekly buyer guide
Practical specs, not advice. Unsubscribe anytime.
I finally got a swivel mount for my living room and it’s a game-changer! Our open-plan living space always made it hard to watch TV from the kitchen, but now I can just pull it out and angle it perfectly. Installation was straightforward, and it feels really sturdy. Definitely recommend for anyone with a similar setup.
This full-motion mount is exactly what I needed for my bedroom. I used to have a fixed mount, but it was impossible to get a good angle from bed sometimes. Now I can extend it and tilt it down a bit, which is much more comfortable. The only reason it’s not 5 stars is that the cable management clips were a little flimsy, but I made it work.
I bought an articulating mount hoping to solve the issue of glare in my sunroom. While it does offer great flexibility to move the TV, I found that the extension from the wall wasn’t quite as much as I’d hoped for my specific corner. It’s good for minor adjustments, but if you need a really dramatic pull-out, double-check the specs for your model.
Seriously impressed with the versatility of these mounts. I have a multi-zone setup in my basement, and being able to adjust the TV horizontally and vertically means everyone gets a great view, no matter where they’re sitting. It really does make the television adaptable to your lifestyle. Best upgrade I’ve made in a while.