A motorized ceiling TV mount offers intelligent space management, sleek aesthetics, and unparalleled viewing flexibility, allowing your television to appear and disappear at the touch of a button. These advanced mounts are ideal for reclaiming valuable wall space, enhancing home theater experiences, and integrating technology discreetly into modern living environments. They typically accommodate TVs from 32 to 70 inches, with some models supporting up to 90 inches, and feature dynamic adjustments like 0-75 degree tilt and up to 360-degree swivel.
Why Go Motorized? The Unbeatable Benefits
Imagine a living room free from the visual clutter of a large screen when it’s not in use, or a bedroom where your TV glides down effortlessly for a late-night movie. This is the magic of motorized ceiling TV mounts. For explore our tv mounts reviews on this site.
Seamless Integration and Aesthetics
One of the primary appeals of a motorized ceiling TV mount is its ability to make your television seemingly vanish. When not in use, these mounts tuck your TV discreetly against or within the ceiling, offering an incredibly clean and minimalist look. This is especially valuable in open-concept living areas or rooms where a permanent TV presence would disrupt the design flow. It’s not just hidden; it’s integrated, becoming part of your home’s architecture rather than a standalone fixture.
Ultimate Viewing Flexibility
Static mounts, while functional, often limit your viewing angles. Motorized ceiling mounts, however, offer dynamic adjustments that can cater to almost any seating arrangement or room layout. Many models feature a significant tilt range, often from 0 to 75 degrees, allowing you to eliminate glare and achieve the perfect vertical viewing angle from a sofa, bed, or even a treadmill in your home gym. Beyond tilt, some advanced mounts include swiveling capabilities, allowing your TV to rotate up to 180 degrees, or even a full 360 degrees, making it viewable from multiple spots in a large room. The best part? Many come with memory settings, so your ideal viewing positions are just a quick button press away.
Maximize Your Space
In an era where every square foot counts, a motorized ceiling mount is a major upgrade for space optimization. By moving the TV off walls and floors, it frees up critical real estate that can be used for artwork, shelving, or simply to create a more open, uncluttered environment. This is a brilliant solution for smaller apartments, kitchens with limited wall space, or even mobile environments like RVs and boats where space is a premium.
Versatile Applications
|
Our Picks for the Best TV Mount in 2026
As an Amazon Associate I earn from qualifying purchases.
|
||
| Num | Product | Action |
|---|---|---|
| 1 | monTEK Motorized Ceiling TV Mount for 43-86 Inch TVs, Heavy-Duty 121lbs (4X Load Tested), Off-Center VESA Compatible, Electric Flip Down with Remote/App/Voice Control, Fits Flat & Pitched Roof |

|
| 2 | Amazon Basics Full Motion Articulating TV Wall Mount, with Swivel and Tilt, for 26\" to 55\" TVs and Flat Panels up to 80 Lbs, VESA Compatible, Black |
|
| 3 | USX Mount Full Motion TV Wall Mount for Most 42-90 inch Flat Screen/LED/4K, TV Mount Bracket Dual Swivel Articulating Tilt 6 Arms, Max 16\" Wood Studs, VESA 600x400mm, Holds up to 132lbs |
|
| 4 | Pipishell Full Motion TV Wall Mount for Echo Show 21/15 and 13-43 Inch Flat Curved Screen TVs & Monitors, Max VESA 200x200mm up to 44lbs, TV Mount Wall Bracket with Rotation Swivel Tilt Extension |
|
| 5 | USX MOUNT Full Motion TV Wall Mount for Most 32-70 inch TVs up to 99 lbs, Wall Mount Bracket with Dual Articulating Arms, Swivel, Tilt, Max VESA 400x400mm, TV Mount Fits 12”/16” Wood Studs |
|
| 6 | Mounting Dream TV Wall Mount for 32-65 Inch Television,Mount with Swivel and Tilt, Full Motion Bracket with Articulating Dual Arms, Fits 16inch Studs, Max VESA 400X400 mm, 99lbs, MD2380 |
|
| 7 | Magnetic Monitor Wall Mount for Steel Surfaces, Fits 13 to 34 Inch Screens, Holds up to 22 lbs, VESA 75/100 Compatible Wall Mount for Computer and TV Monitor, No-Drill Installation with All Screws |
|
| 8 | Mounting Dream TV Wall Mount for Most 37-75 Inch TVs, Universal Tilt TV Mount Fit 16\", 18\", 24\" Stud with Loading Capacity 132lbs, Max Vesa 600 x 400mm, Low Profile Flat Wall Mount TV Bracket |
|
| 9 | MOUNTUP Full Motion TV Wall Mount for Most 26-60 Inch TVs, Max VESA 400x400mm Wall Mount TV Bracket with Swivel Tilting Extension Level Adjustment for LED LCD Flat Curved TVs Up to 77 LBS, MU0018 |
|
| 10 | Perlegear Full Motion TV Wall Mount for Most 42–86 inch Flat Curved TVs up to 132 lbs, 12″/16″ Wood Studs, Bracket with Articulating Arms, Swivel, Tool-Free Tilt, Max VESA 600x400mm PGLF12 |
|
The utility of these mounts extends far beyond the typical living room. They are ideal for:
- Bedrooms: Enjoy your favorite shows without a screen dominating the room during the day.
- Home Gyms: Flip down your TV for workout videos, then tuck it away when done.
- Kitchens: Watch recipes or news without sacrificing valuable counter or cabinet space.
- Offices & Conference Rooms: A sophisticated way to display presentations or video calls, then hide the screen for a minimalist meeting space.
- Commercial Settings: Perfect for digital signage in retail stores or restaurants, offering a sleek, modern display solution.
Choosing the Perfect Motorized Ceiling TV Mount
Selecting the right motorized ceiling TV mount requires careful consideration to ensure it meets your specific needs and integrates flawlessly with your space.
TV Size and Weight Capacity
The first rule of any TV mount is compatibility. Motorized ceiling mounts are designed to accommodate a range of TV sizes, typically from 32 inches up to 70 inches, with some robust models handling screens up to 90 inches. More importantly, always verify the mount’s weight capacity. Most models support between 66 lbs and 88 lbs, with some heavy-duty options reaching 120 lbs. Always choose a mount with a weight capacity that comfortably exceeds your TV’s weight for safety and longevity.
the VESA mounting standard – the pattern of mounting holes on the back of your TV. Common VESA patterns supported by motorized ceiling mounts range from 200x100mm to 600x400mm or even 600x600mm. Check your TV’s manual or measure the distance between the holes to ensure a match.
Ceiling Type and Structure
This is perhaps the most critical factor. Motorized ceiling mounts require a secure anchor point, typically into a sturdy ceiling joist (for wood ceilings) or concrete.
- Flat vs. Pitched Ceilings: Many modern motorized mounts are designed to work seamlessly on both flat and sloped (pitched) ceilings, often featuring adjustable tilt mechanisms to ensure the screen hangs level regardless of the ceiling angle.
- Ceiling Material: For wood-framed ceilings, you’ll need to locate ceiling joists using a reliable stud finder. For concrete or brick ceilings, specialized concrete anchors are required. Never attempt to mount directly into drywall or plaster without proper reinforcement, as it cannot support the weight.
Movement Features and Control Options
Consider how you want your TV to move and how you want to control it.
- Tilt, Swivel, and Drop Distance: Beyond the basic flip-down motion, think about whether you need extensive tilt or swivel for your viewing angles. Also, consider the maximum drop distance if you have very high ceilings to ensure the TV reaches a comfortable viewing height.
- Memory Settings: A highly convenient feature that allows you to save and instantly recall your favorite viewing positions, perfect for different activities like watching movies, gaming, or general TV viewing.
- Remote and App Control: Most motorized mounts come with a multi-directional RF (Radio Frequency) remote control. Many also offer smart app control, letting you operate your TV mount from your smartphone or tablet, often with more advanced customization options.
Quiet Operation and Durability
A motorized mount should enhance your experience, not detract from it with loud whirring noises. Look for models advertised with quiet motors. Durability is also key; mounts constructed from strength-tested steel ensure your valuable television remains securely in place for years to come.
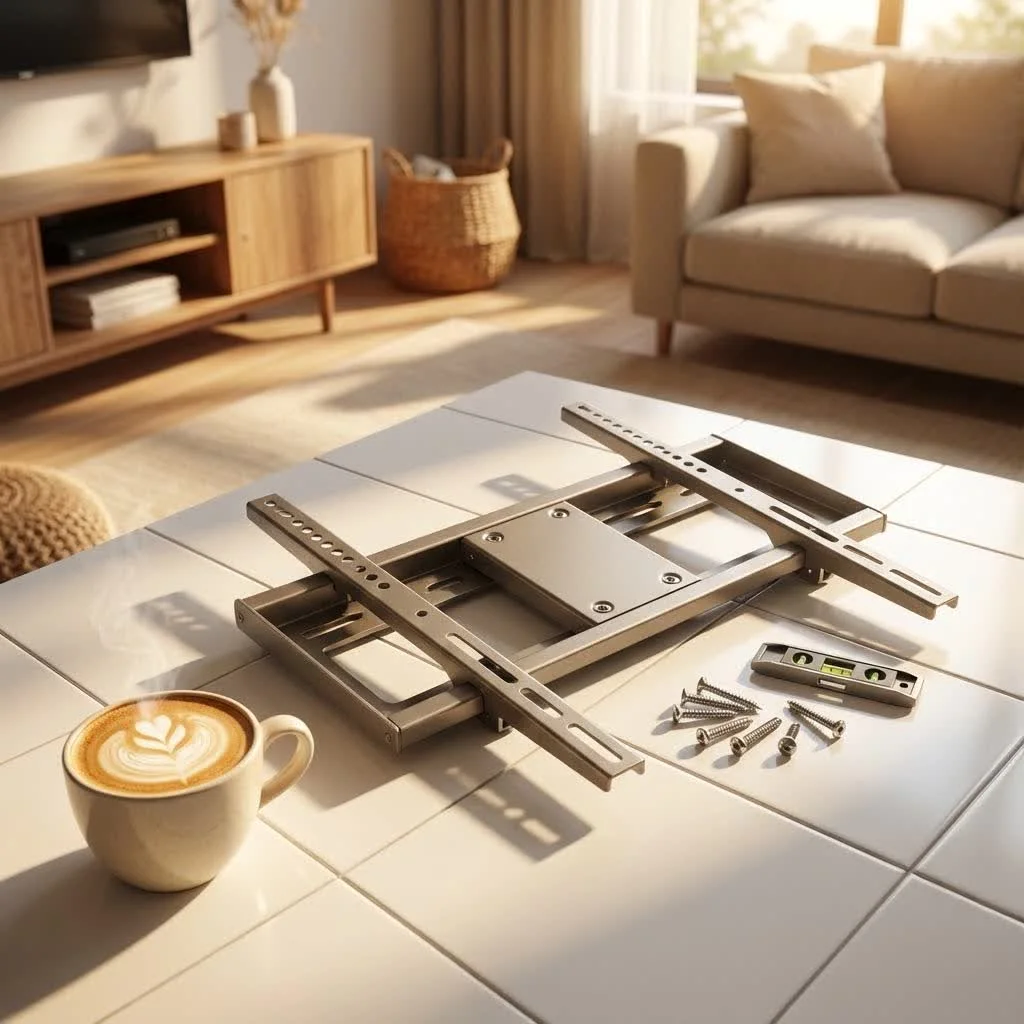
Step-by-Step Installation Guide: Mounting Your Motorized TV with Confidence
Installing a motorized ceiling TV mount is a rewarding DIY project, but it demands precision and careful execution. While generally considered straightforward, it’s definitely a two-person job for safety and ease.
1. Preparation is Key
- Gather Your Tools: You’ll typically need a stud finder, drill (with appropriate drill bits for wood or concrete), level, measuring tape, pencil, screwdriver, and possibly a ladder or scaffolding.
- Verify Ceiling Structure: Use your stud finder to accurately locate and mark the center of the ceiling joists where the mount will attach. If you have a concrete ceiling, mark your desired mounting points directly. “Always double-check your measurements and the structural integrity of your ceiling before drilling a single hole,” advises Alex Harding, Dikfu.com’s Senior Installation Specialist. “A solid foundation is non-negotiable for safety and stability.”
- Unpack and Organize: Lay out all mount components and hardware. Familiarize yourself with the instruction manual and the mounting template (if included).
2. Marking and Drilling Pilot Holes
- Position the Template: Hold the mounting template or the mount base itself against the ceiling at your desired location, ensuring it’s perfectly centered over your marked joist or concrete points. Use a level.
- Mark Drill Points: Mark the precise center of each mounting hole with a pencil.
- Drill Pilot Holes:
- For Wood Joists: Use a 3/16-inch drill bit to drill pilot holes to the specified depth (e.g., 2.2 inches).
- For Concrete/Brick: Use a 3/8-inch drill bit to drill holes to the required depth (e.g., 2.4 inches). Avoid drilling into mortar lines between bricks or stones.
3. Securing the Mount Base
- For Wood Ceilings: Align the mount base with the pilot holes. Use the provided lag screws and washers to secure the mount firmly to the ceiling joists. Tighten until snug, but do not overtighten.
- For Concrete Ceilings: Insert concrete anchors into the drilled holes, tapping them gently with a hammer until fully seated. Remove nuts and washers from the anchors, place the mount over the exposed bolts, then reattach washers and nuts. Tighten securely.
4. Assembling the VESA Plate and Arms
- Motorized mounts often come with horizontal and vertical VESA arms that attach to a central bracket. Assemble these according to your TV’s VESA pattern. Ensure you maintain the minimum required clearance (e.g., 0.6 inches) between the ceiling and the top of your TV once installed.
- Select the appropriate mounting bolts and washers for your TV’s mounting holes. Use spacers if necessary to prevent overtightening and ensure a snug fit.
5. Attaching Your TV
- This step requires at least two people. Carefully lay your TV face down on a soft, clean surface.
- Attach the assembled VESA plate to the back of your TV using the selected bolts, washers, and spacers. Tighten until secure, but again, avoid overtightening.
- Once the VESA plate is secured to the TV, align the hook on the motorized mount arm with the slot on the central plate attached to the TV. Carefully lift the TV and hook it into place.
- Reinstall any securing bolts or clips as per the manual to lock the TV onto the mount. Use the level to ensure the TV is perfectly horizontal. Most mounts have fine-tuning adjustments for leveling.
6. Connecting Power and Cable Management
- Power: Connect the power cord to the power adapter, then the adapter to the control unit, and finally the control unit to the motorized mount.
- Cable Management: Route your TV’s power and HDMI cables through the integrated cable management channels within the mount’s pole. Leave enough slack for the TV’s full range of motion (tilt, swivel, drop). This step is crucial for a clean, professional finish.
7. Testing and Adjusting
- Once everything is connected and secured, test the mount’s functionality using the remote control or app.
- Cycle through the full range of motion: raise, lower, tilt, and swivel.
- If your mount has memory settings, program your favorite viewing positions.
- Make any final leveling or positional adjustments.
Troubleshooting Common Motorized Ceiling TV Mount Issues
Even with the best preparation, issues can arise. Here’s how to address some common problems:
- Mount Not Responding to Remote/App: First, check the batteries in your remote. If using an app, ensure your device is connected to the same Wi-Fi network as the mount’s control unit. Verify all power connections are secure. A simple power cycle (unplugging and replugging the mount) can often resolve minor glitches.
- Uneven TV: Most motorized mounts include adjustment screws or bolts on the VESA plate or arms that allow for minor leveling. Loosen these slightly, adjust the TV to level using a spirit level, then retighten firmly.
- Slow Movement: While motorized mounts aren’t designed for lightning-fast movement, if it seems unusually slow, check for any obstructions. Ensure the weight of your TV is within the mount’s specified capacity, as exceeding it can strain the motor.
- Installation Challenges with Sheetrock: If you’re mounting to a sheetrock ceiling and can’t hit a joist directly, you may need to install blocking or bridge a few trusses with thick plywood within the ceiling cavity to create a secure anchor point. This often requires professional help or significant DIY experience.
Expert Insights from Dikfu
“A motorized ceiling TV mount is more than a gadget; it’s an investment in a smarter, more aesthetically pleasing home,” says Dr. Elena Petrova, a renowned expert in smart home integration and a contributing author to Dikfu.com. “The fusion of functionality and discreet design makes these mounts essential for modern living. Prioritize structural integrity during installation, and you’ll enjoy years of seamless entertainment.”
Conclusion
A motorized ceiling TV mount offers a truly unique and sophisticated way to integrate technology into your home while maintaining a sleek, uncluttered aesthetic. By understanding the different types, carefully considering compatibility, and following a precise installation process, you can improve your space and enjoy unparalleled viewing flexibility. At Dikfu.com, we believe that smart home solutions should simplify your life and enhance your environment. Embrace the future of home entertainment with a motorized ceiling TV mount and experience the blend of innovation, convenience, and style firsthand. improve your viewing experience—literally—and enjoy the refined elegance it brings to your home.
Frequently Asked Questions
What are the main benefits of a motorized ceiling TV mount?
Motorized ceiling TV mounts offer seamless integration, allowing your TV to disappear when not in use, and provide ultimate viewing flexibility with tilt ranges up to 75 degrees and swivel capabilities up to 360 degrees. They also maximize space by freeing up walls and floors, making them ideal for modern, minimalist homes or smaller rooms.
What TV sizes and weights can a motorized ceiling mount support?
Most motorized ceiling mounts accommodate TV sizes from 32 inches up to 70 inches, with some heavy-duty models supporting screens up to 90 inches. Regarding weight, typical models support between 66 lbs and 88 lbs, while robust options can handle up to 120 lbs. Always ensure the mount's weight capacity comfortably exceeds your TV's weight.
How do I ensure my ceiling can support a motorized TV mount?
Motorized ceiling mounts require a secure anchor point, typically into a sturdy ceiling joist for wood ceilings or concrete. For wood-framed ceilings, use a stud finder to locate joists. For concrete or brick, specialized concrete anchors are necessary. Never mount directly into drywall or plaster without proper reinforcement.
What control options are available for motorized ceiling TV mounts?
Most motorized ceiling TV mounts come with a multi-directional RF remote control for basic operation. Many advanced models also offer smart app control, allowing you to operate the mount from your smartphone or tablet with more customization options, including memory settings for favorite viewing positions.
Can motorized ceiling TV mounts be installed on sloped ceilings?
Yes, many modern motorized mounts are designed to work seamlessly on both flat and sloped (pitched) ceilings. These mounts often feature adjustable tilt mechanisms that ensure the screen hangs level and provides optimal viewing angles regardless of the ceiling's angle.
Install a Motorized Ceiling TV Mount
This guide provides a step-by-step process for safely and effectively installing a motorized ceiling TV mount, ensuring a secure and aesthetically pleasing setup.
Gather all necessary tools, including a stud finder, drill, level, and measuring tape. Use the stud finder to accurately locate and mark ceiling joists or desired concrete mounting points. Unpack and organize all mount components, familiarizing yourself with the instruction manual and any mounting templates.
Position the mounting template or mount base against the ceiling, ensuring it's perfectly centered and level over your marked structural points. Mark the precise center of each mounting hole with a pencil. Drill pilot holes using a 3/16-inch bit for wood joists (e.g., 2.2 inches deep) or a 3/8-inch bit for concrete (e.g., 2.4 inches deep), avoiding mortar lines.
For wood ceilings, align the mount base with the pilot holes and secure it firmly to the ceiling joists using the provided lag screws and washers, tightening until snug. For concrete ceilings, insert concrete anchors into the drilled holes, then secure the mount over the exposed bolts with washers and nuts, tightening securely.
Assemble the VESA plate and arms according to your TV's VESA pattern, ensuring proper clearance. With at least two people, carefully lay your TV face down and attach the assembled VESA plate to its back using appropriate bolts, washers, and spacers. Lift the TV and hook it onto the motorized mount arm, then reinstall any securing bolts or clips and use a level to ensure it's perfectly horizontal.
Connect the power cord to the adapter, then to the control unit, and finally to the motorized mount. Route all TV and HDMI cables through the mount's integrated cable management channels, leaving enough slack for full motion. Test the mount's functionality using the remote or app, cycling through its full range of motion and programming any desired memory settings.
Get our weekly buyer guide
Practical specs, not advice. Unsubscribe anytime.
This type of mount is perfect for our bedroom. We have a 55-inch TV and the 0-75 degree tilt feature is fantastic for watching movies in bed. It’s so convenient to just press a button and have it glide down. My only minor complaint is that the motor is a little louder than I expected, but it’s not a dealbreaker.
I finally pulled the trigger on a motorized ceiling mount for my 65-inch TV, and it’s been a game-changer. The ability to have the TV disappear when not in use really cleans up my living room. Installation was a bit tricky, but totally worth it for the sleek aesthetics and reclaiming that wall space. My wife loves how discreet it is.
I was hesitant about the cost, but a motorized ceiling TV mount was the best decision for our open-concept kitchen/dining area. Our 42-inch TV now effortlessly glides down for viewing during meals and tucks away when we’re entertaining. It truly enhances the home theater experience without dominating the room. Highly recommend for anyone wanting to integrate technology discreetly.
I got one of these for my home theater setup, specifically for a 70-inch TV. While the concept of intelligent space management is great, I found the setup instructions for the 360-degree swivel feature to be a bit confusing. It took me longer than anticipated to get it perfectly aligned. Once it’s working, it’s cool, but the initial calibration was a hassle.